the sample code from the OpenGL RedBook
A collection of a couple of more GLUT examples
Nate Robins OpenGL tutors programs
(very good for gaining an intuitive understanding!)
(very good for gaining an intuitive understanding!)
If you like this site & want to see more posts, buy me a coffee! Even a $1 donation would make me really happy. Thanks for reading
 (bill.sherif@gmail.com)
//////////////////////////////////////////
//                                      //
// Using zlib                           //
//                                      //
// You found this at bobobobo's weblog, //
// https://bobobobo.wordpress.com        //
//                                      //
// Creation date:  Feb 22/08            //
// Last modified:  Feb 23/08            //
//                                      //
//////////////////////////////////////////

//////////////////////////////////////////
//////////////////////////////////////////
///////////  BEFORE YOU START  ///////////
//////////////////////////////////////////
//////////////////////////////////////////

// Visit zlib.net, bookmark it,
// and grab the dll version of zlib.

// Once you get zlib, as the docs say:
// "Copy ZLIB1.DLL to the SYSTEM or the
//  SYSTEM32 directory."

// C:\WINDOWS\System32 may not work for you
// if you're on 64-bit.  Instead, use
// the C:\WINDOWS\System directory.

// If you don't do this, you get this error
// when you try to launch any program
// that uses "zlib1.dll":

/*
     "THIS APPLICATION has failed to start
      because zlib1.dll was not found.
      Re-installing the application
      may fix this problem."
*/

// This is because Windows can't find
// the dll.

// The other option is to place the
// .dll file in the same directory
// as the EXECUTABLE that uses the
// dll.  So, you'd copy out zlib1.dll
// into the Using_zlib\debug folder,
// since that's where visual studio
// dumps the final executable after building.

/////////////////////
// QUICK NOTES ABOUT .LIB AND .DLL FILES:
//
// .LIB FILES:
//
// .lib files are library files and they
// are used for static linking.  That is,
// they contain precompiled code that other
// applications can link to.  When you link
// your application with a .lib library, then
// the .lib library's code is intermixed
// with your own code in the final executable.

// .DLL FILES:
//
// .dll files are dynamically linked library files
// and applications link to them at runtime.

/////////////
// WHAT'S A DLL?

// What's a DLL anyway?

// DLL stands for DYNAMICALLY
// LINKED LIBARY.

// Why "LIBRARY"?  Well, clearly because
// the .DLL is just a LIBRARY of
// FUNCTIONS that you can CALL.

// ZLIB is really just a bunch of
// subroutines that you use to zip
// and unzip data.

// "DYNAMICALLY LINKED":  Because
// the actual code of ZLIB (that performs
// the zipping and unzipping operations),
// is going to REMAIN STORED inside of
// zlib.dll.

// Even though your program that you write
// will make calls to zlib's functions,
// THERE WILL BE NO _ACTUAL_ ZLIB CODE
// IN __YOUR__ FINAL EXECUTABLE.

// In other words, the actual ZIP /UNZIP
// code routines WILL NOT be packed into
// YOUR final executable that you build
// with your code when you use zlib.dll.

// Instead, your code will contain REFERENCES TO
// the actual executable code pieces inside
// of zlib.dll, and WINDOWS will resolve
// ("LINK") your application's calls with
// the .dll file's subroutines DYNAMICALLY
// (AT RUN TIME).

// Hence the term "dynamically linked library".
// Because the LINKING of the code happens
// DYNAMICALLY ("dynamically" just means
// "at run time", just like "dynamically allocated
// memory" is memory that you allocate at
// run time using malloc()).

// So at the end of the day, a .dll file
// just contains a bunch of CODE.

// The difference comes in in HOW the
// Windows operating system manages
// that code.

///////////////////////////
// WHAT'S THIS FILE?
//
// This project shows you how to use zlib.
// Its a console project, because there's
// no need to create a window to demonstrate
// use of zlib.

// "words.txt" was generated from the 5 letter
// words listed @ http://www.math.toronto.edu/~jjchew/scrabble/lists/common-5.html

#include <stdio.h>
#include <stdlib.h>
#include <time.h>

#include <windows.h>

// the zlib.h header file contains
// function prototypes and a lot
// of information about zlib!
#include "zlibdll/include/zlib.h"

// link the static lib
#pragma comment (lib, "zlibdll/lib/zdll.lib" )


int main()
{
    srand(time(0));      // seed random number generator

    bool showOutput;     // make false if you don't want text output
    printf( "Show textual output?  [y/n]\n");
    if ( tolower(getchar()) == 'y' )
        showOutput = true;
    else
        showOutput = false;


    printf("*********************\n");
    printf("* zlib test file\n");
    printf("* Using version %s of zlib\n", zlibVersion() ) ;

    #pragma region _make some data to compress_
    const int NUM_WORDS = 8938;     // pre-counted constant

    char * randomWords[ NUM_WORDS ] = {
#include "words.txt"  // get in project files
    };


    const int NUM_WORDS_TO_USE = 80;

    // Fill dataOriginal with a random jumbling of
    // 80 * (5 letter words + 1 space)
    // (each word followed by a space).
    int sizeDataOriginal = 6 * NUM_WORDS_TO_USE + 1 ;
    printf("* Before compression:  your data is %d bytes\n", sizeDataOriginal );
    BYTE * dataOriginal = (BYTE*)malloc( sizeDataOriginal );

    for( int i = 0; i < 6 * NUM_WORDS_TO_USE; i += 6 )
    {
        int randomIndex = rand() % NUM_WORDS ;
        static char buf[6];
        strncpy( buf, randomWords[ randomIndex ], 5 );  // don't copy the NULL character.
        buf[5] = ' ';
        strncpy( (char*)(dataOriginal+i), buf, 6 );
    }

    dataOriginal[ sizeDataOriginal - 1 ] = NULL; // null terminator.
    // test it.
    printf("* \n* Here's the data we generated for you:\n\n--\n");
    if( showOutput )
    {
        for( int i = 0 ; i < sizeDataOriginal ; i++ )
        {
            putchar( dataOriginal[i] ); // coulda puts'd this
            // but wanted to be consistent.
        }
        printf("\n--\n\n");
    }
    else
        printf(" (suppressed)\n--\n\n");
    #pragma endregion

    #pragma region compress the data
    //////////////
    // compress it.
    // To compress some data, we'll use the compress()
    // function.

    // To use the compress function, we must
    // create a destination buffer to
    // hold the compressed data.

    // So how big should the compressed
    // data buffer be?

    // This may seem a bit weird at first,
    // but the array that is to hold the compressed
    // data must start out being AT LEAST 0.1% larger than
    // the original size of the data, + 12 extra bytes.

    // So, we'll just play it safe and alloated 1.1x
    // as much memory + 12 bytes (110% original + 12 bytes)

    ULONG sizeDataCompressed  = (sizeDataOriginal * 1.1) + 12;

    BYTE * dataCompressed = (BYTE*)malloc( sizeDataCompressed );

    // Now hold on, you ask.  WHY is the array
    // that's supposed to hold the COMPRESSED
    // data ALREADY BIGGER than the original
    // data array?  This isn't compression!
    // This is meaningless expansion!

    // Well, you'll see that this extra space
    // in the compressed array is only TEMPORARY.
    // Just suffice it to say that zlib
    // "needs room to breathe".

    // When zlib performs compression, it will
    // need a bit of extra room to do its work.

    // When the compress() routine returns,
    // the compressedData array will have
    // been AUTOMATICALLY RESIZED by ZLIB
    // to being a smaller, compressed size.

    // We will also know the EXACT size of
    // that compressed data by looking at
    // the 'sizeDataCompressed' variable
    // AFTER the compress() routine runs.
    // That variable 'sizeDataCompressed'
    // will updated by the compress()
    // function when we call it!

    // Don't worry, the "compressed" data
    // will be smaller than the original
    // data was in the end!
    int z_result = compress(

        dataCompressed,         // destination buffer,
                                // must be at least
                                // (1.01X + 12) bytes as large
                                // as source.. we made it 1.1X + 12bytes

        &sizeDataCompressed,    // pointer to var containing
                                // the current size of the
                                // destination buffer.
                                // WHEN this function completes,
                                // this var will be updated to
                                // contain the NEW size of the
                                // compressed data in bytes.

        dataOriginal,           // source data for compression

        sizeDataOriginal ) ;    // size of source data in bytes

    switch( z_result )
    {
    case Z_OK:
        printf("***** SUCCESS! *****\n");
        break;

    case Z_MEM_ERROR:
        printf("out of memory\n");
        exit(1);    // quit.
        break;

    case Z_BUF_ERROR:
        printf("output buffer wasn't large enough!\n");
        exit(1);    // quit.
        break;
    }

    printf("*******************************\n");
    printf("* DATA COMPRESSION COMPLETE!! :\n");
    printf("*\n");
    printf("* Compressed size is %d bytes\n", sizeDataCompressed );
    printf("* This is what it looks like:\n\n--\n");

    // Now we want to print the compressed data out.
    // Can't just printf() it because
    // the nulls will be all over the place, and there
    // isn't necessarily a null at the end.
    if( showOutput )
    {
        for( int i = 0; i < sizeDataCompressed; i++ )
        {
            putchar( dataCompressed[i] );
        }
        printf("\n--\n\n");
    }
    else
        printf(" (suppressed)\n--\n\n");
    #pragma endregion

    #pragma region save compressed data to disk
    //////////////////
    // Save that compressed data to disk.
    // Maybe its save game information or
    // something.
    printf("********************************\n");
    printf("* Saving compressed data to disk\n\n");

    ///////////////////////////////////////////////
    //////////////!!!!!!!!!!!!!!!!!!!!/////////////
    //////////////!!!IMPORTANT NOTE!!!/////////////
    // You see how I'm opening the file in "wb" mode,
    // NOT just "w" mode?????
    FILE * out = fopen( "savedData.dat", "wb" );
    // Well, "wb" means BINARY MODE for writing.
    // THIS IS EXTREMELY IMPORTANT.  IF YOU DON'T
    // USE "wb" TO WRITE YOUR FILES, AND YOU DON'T
    // USE "rb" TO READ YOUR FILES, YOU FILE
    // WILL BE VERY SLIGHTLY CORRUPTED,
    // WINDOWS PROMISES YOU THAT!!

    // One of the reasons for the corruption is
    // under Windows, if you write out a
    // NEWLINE (ASCII code 10, escape sequence "\n",
    // aka the "LINEFEED" (LF)) to the output stream,
    // then Windows puts out a 13 FIRST, then a 10.

    // 13 is the ascii code for CARRIAGE RETURN (CR),
    // and 10 is ascii code for the Linefeed (LF).

    // Now that seems awfully stupid.  Why would Windows
    // output hex 0D 0A when I clearly asked it to
    // output just 0A?

    // The answer is that Windows uses TWO CHARACTERS
    // to designate the new line:  (CRLF), NOT just LF.

    // Unix uses just LF.  Macs use just CR.  (Windows is
    // the only weirdo that uses 2 characters for a newline.
    // I suppose you could say that this is more true to the
    // original typewriter (or the dot matrix printer),
    // where you have to push the "carriage" (thing that types)
    // back to the left side (carriage return), then
    // you have to feed the paper up a line (linefeed)).

    // SO, this is significant because everytime you write
    // the integer value 10 to the output stream, IF you're
    // NOT writing in binary mode, Windows thinks you're
    // trying to write text.  So NATURALLY, if you write
    // the integer value 10 out in one of the bytes,
    // Windows recognizes this is a linefeed and
    // write out 13 10 instead.

    // This introduces extra data into your output
    // and is enough to significantly corrupt the result.

    if( out == NULL )
    {
        printf("Couldn't open output file for writing\n");
        exit(1);    //quit
    }
    fwrite( dataCompressed, sizeDataCompressed, 1, out );
    fclose( out );
    out = NULL;
    #pragma endregion

    #pragma region read in data from disk
    ///////////////
    // Next, we'll READ the compressed data
    // from the file, then DECOMPRESS it, to
    // prove that it'll be the same as
    // the original data.
    printf("********************************\n");
    printf("* Reading in data from save file\n");

    //////////////!!!!!!!!!!IMPORTANT:  note "rb"
    // NOT just "r".
    FILE * readFile = fopen("savedData.dat", "rb");
    if( readFile == NULL )
    {
        printf("Couldn't open input file for reading\n");
        exit(1);    //quit
    }

    // get size of file
    fseek( readFile, 0, SEEK_END );
    ULONG fileLength = ftell( readFile );
    rewind( readFile );

    // allocate enough mems to hold entire file
    // alternatively, we could "memory map" the
    // file contents using the CreateFileMapping and
    // MapViewOfFile funcs.
    BYTE * dataReadInCompressed = (BYTE*)malloc( fileLength );

    // read in entire file
    fread( dataReadInCompressed, fileLength, 1, readFile );

    // close file
    fclose( readFile );
    readFile = NULL;

    printf("*\n* This is what I read from the saved file:\n");
    printf("\n--\n");
    if( showOutput )
    {
        for( int i = 0 ; i < fileLength ; i++ )
        {
            putchar( dataReadInCompressed[i] );
        }
        printf("\n--\n\n");
    }
    else
        printf(" (suppressed)\n--\n\n");
    #pragma endregion

    #pragma region decompress the read-in data
    ///////////////
    // Next, we'll decompress that
    // data we just read in from disk.

    // How large should we make the array
    // into which the UNZIPPED/UNCOMPRESSED
    // data will go?

    // WELL, there's the catch with ZLIB.
    // You never know how big compressed data
    // will blow out to be.  It can blow up
    // to being anywhere from 2 times as big,
    // or it can be (exactly the same size),
    // or it can be up to 10 times as big
    // or even bigger!

    // So, you can tell its a really bad idea
    // to try to GUESS the proper size that the
    // uncompressed data will end up being.

    // You're SUPPOSED TO HAVE SAVED THE INFORMATION
    // about the original size of the data at
    // the time you compress it.

    // There's a note on how to do that easily
    // at the bottom of this file, in the end notes.

    // FOR NOW, we're just going to
    // use the dataSizeOriginal variable.
    printf("*******************************\n");
    printf("* Decompressing your data . . .\n");
    ULONG sizeDataUncompressed = sizeDataOriginal;
    BYTE * dataUncompressed = (BYTE*)malloc( sizeDataUncompressed );

    //////////////
    // now uncompress
    z_result = uncompress(

        dataUncompressed,       // destination for the uncompressed
                                // data.  This should be the size of
                                // the original data, which you should
                                // already know.

        &sizeDataUncompressed,  // length of destination (uncompressed)
                                // buffer

        dataReadInCompressed,   // source buffer - the compressed data

        sizeDataCompressed );   // length of compressed data in bytes

    switch( z_result )
    {
    case Z_OK:
        printf("***** SUCCESS! *****\n");
        break;

    case Z_MEM_ERROR:
        printf("out of memory\n");
        exit(1);    // quit.
        break;

    case Z_BUF_ERROR:
        printf("output buffer wasn't large enough!\n");
        exit(1);    // quit.
        break;
    }


    printf("************************\n");
    printf("* Uncompressed size is %d bytes\n", sizeDataUncompressed );
    printf("* Your UNCOMPRESSED data looks like this:\n");

    printf("\n--\n");
    if( showOutput )
    {
        for( int i = 0 ; i < sizeDataUncompressed ; i++ )
        {
            putchar( dataUncompressed[i] );
        }
        printf("\n--\n\n");
    }
    else
        printf(" (suppressed)\n--\n\n");
    #pragma endregion

    #pragma region compare decompressed data with original data
    if( memcmp( dataOriginal, dataUncompressed, sizeDataOriginal ) == 0 )
    {
        printf("* SEE?  It was EXACTLY the same.\n");
    }
    else
    {
        printf( "\n\n=====================================\n"
                "Oh. . . dear.  There is a problem.  The uncompressed data "
                "isn't exactly the same as the original data.  Your data "
                "may be corrupted.  WHOOPS!!\n"
                "Please make sure if that you are reading and writing "
                "any file i/o in BINARY MODE." );
    }
    #pragma endregion

    free( dataOriginal );
    free( dataCompressed );
    free( dataReadInCompressed );
    free( dataUncompressed );

}

/////////
// END NOTES:

// So in this tutorial, when I saved the
// data out to a file, I just used fwrite()
// and dumped the array of bytes with no
// information ABOUT what the file is
// whatsoever.

// in real life, that's probably not a good idea.
// You want to always output at the beginning
// of your compressed data AT LEAST the size
// the data will be when it becomes uncompressed.
// This is the only way you can know how big
// to make the "receiving array" for the uncompressed data.

// ZLIB has no "tell_me_the_size_of_this_thing_
// when_it_gets_uncompressed() function.

// You MUST keep that data in the file itself.

// So, you might create a structure like thus
// and like so:

/*

struct saveFile
{
    ULONG compressedSize;   // size of the data array, compressed
    ULONG uncompressedSize; // size when data gets uncompressed
    char what[16];          // what is this file?  may want to
                            // indicate what kind of data is saved here.

    // add whatever other info you need
    // here.

    BYTE * data;            // the actual compressed data

};

*/

// Then, just fwrite out the data,
// with a couple of fwrites().

// When you fread it, you fread the
// size fields first . . . you know
// what to do.

/*
     ____   __   __      __   __  ___
    / _  \ /  / /  /    /  /  \ \/  /
   / _/ / /  / /  /    /  /    \   /
  / _/ \ /  / /  /__  /  /__   /  /
 /_____//__/ /______//______/ /__/

*/
Download the Visual Studio 2005 project files.
If you like this site & want to see more posts, buy me a coffee! Even a $1 donation would make me really happy. Thanks for reading
(bill.sherif@gmail.com)
I was attempting to use buffered input for the mouse and I was getting erratic behavior at first.
What was the problem?
Here we have some code. g.xPos and g.yPos are floats.
switch( inputData.dwOfs )
{
    case DIMOFS_X:
        g.xPos += inputData.dwData ;
        break;

    case DIMOFS_Y:
        g.yPos += inputData.dwData ;
        break;
}
At first glance, this appears to work fine. At least, it works fine until you try to move the mouse up or left.
Then all hell breaks loose. The mouse jumps nonsensically offscreen to the right when you pull it left, and it jumps to the extreme bottom when you move it even one pixel up.
Closer inspection reveals that insanely huge values are being added to g.xPos and g.yPos whenever you move the mouse left or up.
So you know what the problem is now, huh.
dwData is unsigned.
int * d = (int*)&inputData.dwOfs ;

switch( inputData.dwOfs )
{
    case DIMOFS_X:
        g.xPos += *d;
        break;

    case DIMOFS_Y:
        g.yPos += *d;
        break;
}
I think microsoft made a bad typing decision here. Why is dwData unsigned when its going to carry signed data . . ?
Sheesh.
/////////////////////
// This function is just for quickly
// bailing out of your DirectX app when
// there's an error.
// There's also a few macros like DXTRACE_ERR_MSGBOX
// defined in <dxerr.h> but I don't like them
#include <dxerr.h>
#pragma comment ( lib, "dxerr.lib" );


void exitAppWithErr( HRESULT hr, TCHAR * err )
{
    TCHAR fullErr[ 1024 ];

    wsprintf( fullErr, TEXT("%s.\nDirectX says:  \"%s:  %s\"." ),
err, DXGetErrorString( hr ), DXGetErrorDescription( hr ) ) ;

    FatalAppExit( 0, fullErr );
}
// EXAMPLE call:
    exitAppWithErr( hr, TEXT("Problem creating secondary sound buffer") ) ;
I like Behind the code.
Everyone loves the redbook.
It is an excellent book.
However, even excellent books contain some mistakes.
I’m highlighting one mistake that was particularly troublesome to me today.
“If the last value, w, is zero, the corresponding light source is a directional one, and the (x, y, z) values describe its direction.”
This is wrong.
The statement should read:
“If the last value, w, is zero, the corresponding light source is a directional one, and the (x, y, z) values describe its POSITION IN SPACE.”
How annoying. The quotation remains this way in the 5th edition of the redbook, and I doubt it was changed in the 6th.
Does your lighting look odd, even though you’re certain you’ve computed the normals correctly? I recently ran into this issue and overlooked something very simple. After checking my normal computations again and again and being CERTAIN they were right, I found that the problem was not my normal computations at all. It was my setting up of the glLight.


That looks wrong.
AFTER I FIXED IT, I finally got this:

And this:

After checking my normal computatations again and again and being certain there wasn’t anything wrong with them, I went to check out my glLightfv() function calls.
I had made sure to specify my glLightfv() calls in my Init() function . .
glLightfv() was being called ONLY once at the beginning of the program . . . AND THAT WAS THE PROBLEM.
EVERYTIME YOU DRAW THE SCENE, you must re-specify the position of the light using a
glLightfv( GL_LIGHT0, GL_POSITION, lightVector );
type call.
So, be sure to put your glLightfv() calls INSIDE YOUR RENDER LOOP!
The trackbar is notorious for giving people trouble when trying to get started with it.
It doesn’t help that the docs or the really poor example page don’t say ANYTHING about what I’m about these small but annoying issues.
Try looking up the error code. If its a 1407, that’s “Cannot find window class.” That happens because you didn’t call:
InitCommonControls();
You have to
#include <commctrl.h>
You have to
#pragma comment( lib, "comctl32.lib" )
Here’s a real quick example of how to get the trackbar working in a basic win32 app (no mfc or .net stuff), fast.
//////////////////////////////////////////
//                                      //
// Trackbars                            //
//                                      //
// You found this at bobobobo's weblog, //
// https://bobobobo.wordpress.com        //
//                                      //
// Creation date:  Feb 13/08            //
// Last modified:  Feb 13/08            //
//                                      //
//////////////////////////////////////////

#include <windows.h>
#include <commctrl.h>       // must have

#pragma comment( lib, "comctl32.lib" )  // must have

////////////////////////
// TRACKBARS!

// We want to add trackbars to our
// windows application.

#define IDCHC_TRACKBAR 4

/////////////////////
// GLOBALS
HWND g_hwnd;
HWND g_trackbarhwnd;
//
/////////////////////

// Function prototypes.
LRESULT CALLBACK WndProc( HWND hwnd, UINT message, WPARAM wparam, LPARAM lparam );
int WINAPI WinMain( HINSTANCE hInstance, HINSTANCE hPrevInstance, LPSTR szCmdLine, int iCmdShow );


////////////////////////////
// In a C++ Windows app, the starting point is WinMain().
int WINAPI WinMain( HINSTANCE hInstance, HINSTANCE hPrevInstance, LPSTR szCmdLine, int iCmdShow )
{
    #pragma region part 1 - create a window
    // A.  Create the WNDCLASS
    WNDCLASS wc;
    wc.cbClsExtra = 0;
    wc.cbWndExtra = 0;
    wc.hbrBackground = GetSysColorBrush( COLOR_APPWORKSPACE );
    wc.hCursor = LoadCursor( NULL, IDC_ARROW );
    wc.hIcon = LoadIcon( NULL, IDI_APPLICATION );
    wc.hInstance = hInstance;
    wc.lpfnWndProc = WndProc;
    wc.lpszClassName = TEXT("Philip");
    wc.lpszMenuName = 0;
    wc.style = CS_HREDRAW | CS_VREDRAW;

    // B.  Register the WNDCLASS with Windows, THEN
    //     create the window.
    RegisterClass( &wc );
    g_hwnd = CreateWindow(
        TEXT("Philip"),
        TEXT("windows app"),
        WS_OVERLAPPEDWINDOW,
        10, 10,
        400, 400,
        NULL, NULL,
        hInstance, NULL );

    ShowWindow(g_hwnd, iCmdShow );
	UpdateWindow(g_hwnd);
    #pragma endregion

    #pragma region add the trackbar
    InitCommonControls();
    g_trackbarhwnd = CreateWindow(
        TRACKBAR_CLASS, // USE PREDEFINED CLASS
                        // MUST #include  TO USE

        TEXT("da trackbar son"),    // doesn't matter what
                                    // you call it -

        WS_CHILD | WS_VISIBLE |
        // next are the Trackbar styles
        TBS_AUTOTICKS |        // trackbar has tick marks
        TBS_HORZ,              // horizontal orientation
        100, 100,
        200, 30,
        g_hwnd,//parent
        (HMENU)IDCHC_TRACKBAR,  // identifier
        hInstance,  //(HINSTANCE)GetWindowLong( g_hwnd, GWL_HINSTANCE ),
        NULL );

    if( g_trackbarhwnd == NULL )
    {
        TCHAR errbuf[300];
        wsprintf( errbuf, TEXT("error code #%d"), GetLastError() );
        FatalAppExit( 0, errbuf );
    }

    /////////////////
    // NOW, as SOON AS the track bar is created,
    // we pelt it with some messages to give it
    // additional information about how we want
    // it to be.  If your computer was INCREDIBLY (20MHz?)
    // slow, you'd see these changes taking place,
    // because the trackbar has already been created
    // and made visible on the main window itself
    // in the line above.
    SendMessage(g_trackbarhwnd,     // hwnd - handle to trackbar
                TBM_SETRANGE,       // message - a message to set the range
                true,               // wparam - redraw it?  yes.
                MAKELONG(0/*MIN RANGE*/, 10/*MAX RANGE*/));  // lparam

    // The only tricky part is lparam.

    // We have to use a tricky macro called MAKELONG.

    ///////////
    // SUPERFICIALLY:
    // You know how when you're processing a
    // WM_LBUTTONDOWN mouse message, the x AND
    // y position of the mouse are BOTH packed
    // into the single variable lparam?
/*
case WM_LBUTTONDOWN:
    int x = LOWORD( lparam );
    int y = HIWORD( lparam );
    break;
*/
    // WELL, MAKELONG( a, b ) works to PACK
    // a and b into a SINGLE variable of type
    // long.

    // It uses bitshifting to do so.
    // Look at its #define if interested.

    // You can send plenty of other messages
    // to your trackbar to customize its look and
    // behavior!

    SendMessage(g_trackbarhwnd, TBM_SETPAGESIZE, true, 1);
    SendMessage(g_trackbarhwnd, TBM_SETTICFREQ, true, 0);
    SendMessage(g_trackbarhwnd, TBM_SETPOS, true, 0);
    SendMessage(g_trackbarhwnd, TBM_SETSEL, true, MAKELONG( 1, 5 ) );


    #pragma endregion

    #pragma region part 2 - enter message loop
    MSG msg;

    while( GetMessage( &msg, NULL, 0, 0 ) )
    {
        TranslateMessage( &msg );
        DispatchMessage( &msg );
    }
    #pragma endregion

    return msg.wParam;
}

LRESULT CALLBACK WndProc(   HWND hwnd, UINT message, WPARAM wparam, LPARAM lparam )
{
    switch( message )
    {
    case WM_CREATE:
        Beep( 50, 10 );
        return 0;
        break;

    case WM_PAINT:
        {
            HDC hdc;
            PAINTSTRUCT ps;
            hdc = BeginPaint( hwnd, &ps );
                // Nothing to draw.
            EndPaint( hwnd, &ps );
        }
        return 0;
        break;

    case WM_KEYDOWN:
        switch( wparam )
        {
        case VK_ESCAPE:
            PostQuitMessage( 0 );
            break;
        default:
            break;
        }
        return 0;

    case WM_DESTROY:
        PostQuitMessage( 0 ) ;
        return 0;
        break;
    }

    return DefWindowProc( hwnd, message, wparam, lparam );
}


/*
     ____   __   __      __   __  ___
    / _  \ /  / /  /    /  /  \ \/  /
   / _/ / /  / /  /    /  /    \   /
  / _/ \ /  / /  /__  /  /__   /  /
 /_____//__/ /______//______/ /__/

*/
Visual Studio 2005 project files for Trackbar on Win32 hosted by esnips (thanks esnips!)
There’s a good msdn article on window translucency using layered windows here.
//////////////////////////////////////////
//                                      //
// COOL TRANSLUCENT WINDOWS!            //
//                                      //
// You found this at bobobobo's weblog, //
// https://bobobobo.wordpress.com        //
//                                      //
// Creation date:  Feb 13/08            //
// Last modified:  Feb 13/08            //
//                                      //
//////////////////////////////////////////


#define _WIN32_WINNT    0x0500  // ya hafta have this
// to use WS_EX_LAYERED . . it tells the compiler
// you're compiling for a platform Windows 2000
// or better

//////////////////////////
// Using CreateWindowEx() -- why???
//
// Now you may have noticed that there's
// TWO functions that you can use
// to create a window:
//     CreateWindow();
// and
//     CreateWindowEx();

// Why use CreateWindowEx()?  Well,
// one reason is you can make
// COOL TRANSLUCENT WINDOWS!!

// There's a ton of other features that
// you can use for Windows that have
// "EXTENDED WINDOW STYLES" -- see
// the CreateWindowEx() docs on msdn

#include <windows.h>


/////////////////////
// GLOBALS
HWND g_hwnd;        // just a global for hwnd
//
/////////////////////

// Function prototypes.
LRESULT CALLBACK WndProc( HWND hwnd, UINT message, WPARAM wparam, LPARAM lparam );
int WINAPI WinMain( HINSTANCE hInstance, HINSTANCE hPrevInstance, LPSTR szCmdLine, int iCmdShow );


////////////////////////////
// In a C++ Windows app, the starting point is WinMain().
int WINAPI WinMain( HINSTANCE hInstance, HINSTANCE hPrevInstance, LPSTR szCmdLine, int iCmdShow )
{
    #pragma region part 1 - use a WNDCLASSEX structure to create a window!!
    // A.  Create the WNDCLASSEX structure.
    //
    // The EX is for "EXTENDED".
    //
    // The WNDCLASSEX structure is very similar to
    // the plain old WNDCLASS structure, EXCEPT
    // that it has quite a few "EXTENDED STYLES!"
    //
    // Let's create a structure and explore.
    WNDCLASSEX wcx;

    wcx.cbClsExtra = 0;
    wcx.cbSize = sizeof( WNDCLASSEX );  // 1.  NEW!  must know its own size.
    wcx.cbWndExtra = 0;
    wcx.hbrBackground = (HBRUSH)GetStockObject( WHITE_BRUSH );
    wcx.hCursor = LoadCursor( NULL, IDC_ARROW );
    wcx.hIcon = LoadIcon( NULL, IDI_APPLICATION );
    wcx.hIconSm = NULL;                 // 2.  NEW!!  Can specify small icon.
    wcx.hInstance = hInstance;
    wcx.lpfnWndProc = WndProc;
    wcx.lpszClassName = TEXT("Philip");
    wcx.lpszMenuName = 0;
    wcx.style = CS_HREDRAW | CS_VREDRAW;

    //////////////////////////////
    // AWW.  Disappointed?  There were only
    // TWO new fields in the WNDCLASSEX structure,
    // and they weren't very exciting
        // (cbSize and hIconSm.)

    //////////////
    // BUT WAIT!!  The cool stuff is yet to come.

    // First, we get to use the RegisterClassEx() function
    // (no more plain old RegisterClass()!!!)
    // to register our WNDCLASSEX struct!! WEEHEE!
    // Actually that is not that cool.

    // B.  Register the WNDCLASSEX with Windows, THEN
    //     create the window.
    RegisterClassEx( &wcx );    // use RegisterClassEx() func!

    //////////////////
    // OK NOW IS THE COOL PART!!  We get
    // to use CreateWindowEx() to actually
    // create our window.  CreateWindowEx()
    // has ONE new params is COOL:
    g_hwnd = CreateWindowEx(
        WS_EX_LAYERED,  // NEW PARAMETER!!
            // EXTENDED STYLES! This "layered
            // style will allow us to make our window
            // TRANSLUCENT (partly see thru!)
        // "Note that WS_EX_LAYERED cannot be used for child windows."

        TEXT("Philip"), // rest are same old.
        TEXT("OOOOOOOOOOOOOOOOH!!! GHOSTLY WINDOW!!"),
        WS_OVERLAPPEDWINDOW,
        10, 10,
        400, 400,
        NULL, NULL,
        hInstance, NULL );

    /////////////
    // SetLayeredWindowAttribute:
    // MUST CALL THIS if using WS_EX_LAYERED.
    // http://msdn2.microsoft.com/en-us/library/ms633540(VS.85).aspx
    SetLayeredWindowAttributes( g_hwnd,     // handle to window to modify
                                0,          // color key (not used when using LWA_ALPHA)
                                85,         // "amount of solidness" = 0=transparent, 255=completely solid
                                LWA_ALPHA );// use my alpha value (prev arg)
                                            // to tell how see 'solid' window is.

    // Try this too, for a weird effect:
    /*
    SetWindowText( g_hwnd, TEXT("All white parts are see thru AND click thru!") );
    SetLayeredWindowAttributes( g_hwnd,         // handle to window to modify
                                RGB(255,255,255),  // colorkey
                                255,            // 0=transparent, 255=completely solid
                                LWA_COLORKEY);  // use COLORKEY specified
                                                // in 2nd arg to be
                                                // TRANSPARENT (leaves holes
                                                // in window
    */

    ShowWindow(g_hwnd, iCmdShow );
    UpdateWindow(g_hwnd);
    #pragma endregion

    #pragma region part 2 - enter message loop
    MSG msg;

    while( GetMessage(&msg, NULL, 0, 0 ) )
    {
        TranslateMessage( &msg );
        DispatchMessage( &msg );
    }
    #pragma endregion

    return msg.wParam;
}

LRESULT CALLBACK WndProc(   HWND hwnd, UINT message, WPARAM wparam, LPARAM lparam )
{
    switch( message )
    {
    case WM_CREATE:
        Beep( 50, 10 );
        return 0;
        break;

    case WM_CHAR:
        switch( wparam )
        {
        case 'G':   // make ghostly
        case 'g':
            // maintain old style, turn on WS_EX_LAYERED bits on.
            SetWindowLongPtr(   hwnd,
                GWL_EXSTYLE,
                GetWindowLong(hwnd, GWL_EXSTYLE) | WS_EX_LAYERED);

            SetLayeredWindowAttributes( hwnd,
                0,
                85,  /* "amount of solidness" 0=transparent, 255=solid*/
                LWA_ALPHA);
            // Everytime you make a window ghostly,
            // you MUST call SetLayeredWindowAttributes(),
            // otherwise it won't work properly.
            break;

        case 'S':   // make solid
        case 's':
            // Remove WS_EX_LAYERED from this window's style
            SetWindowLongPtr(   hwnd,
                GWL_EXSTYLE,    // set the EX_STYLE of this window
                GetWindowLong(hwnd, GWL_EXSTYLE) &  // GET old style first
                ~WS_EX_LAYERED);  // turn WS_EX_LAYERED bits off

            // Note:  Use SetWindowLongPtr (NOT SetWindowLong()!)
            // to write code that'll work
            // on both 32-bit and 64-bit windows!
            // http://msdn2.microsoft.com/en-us/library/ms644898(VS.85).aspx
        }
        return 0;
        break;


    case WM_PAINT:
        {
            HDC hdc;
            PAINTSTRUCT ps;
            hdc = BeginPaint( hwnd, &ps );

            EndPaint( hwnd, &ps );
        }
        return 0;
        break;

    case WM_KEYDOWN:
        switch( wparam )
        {
        case VK_ESCAPE:
            PostQuitMessage( 0 );
            break;
        default:
            break;
        }
        return 0;

    case WM_DESTROY:
        PostQuitMessage( 0 ) ;
        return 0;
        break;
    }

    return DefWindowProc( hwnd, message, wparam, lparam );
}

// Toggle the "ghostliness" sample code from:
// http://msdn2.microsoft.com/en-us/library/ms632598(VS.85).aspx


/*
     ____   __   __      __   __  ___
    / _  \ /  / /  /    /  /  \ \/  /
   / _/ / /  / /  /    /  /    \   /
  / _/ \ /  / /  /__  /  /__   /  /
 /_____//__/ /______//______/ /__/

*/
Source code available on esnips in Visual Studio 2005 project files package
PNG format guide by Greg Roelofs (free!)
BMP file format @ fortunecity site
Organic Bit TGA file format ref
Note that although he has

typedef struct
{
    byte  identsize;          // size of ID field that follows 18 byte header (0 usually)
    byte  colourmaptype;      // type of colour map 0=none, 1=has palette
    byte  imagetype;          // type of image 0=none,1=indexed,2=rgb,3=grey,+8=rle packed

    short colourmapstart;     // first colour map entry in palette
    short colourmaplength;    // number of colours in palette
    byte  colourmapbits;      // number of bits per palette entry 15,16,24,32

    short xstart;             // image x origin
    short ystart;             // image y origin
    short width;              // image width in pixels
    short height;             // image height in pixels
    byte  bits;               // image bits per pixel 8,16,24,32
    byte  descriptor;         // image descriptor bits (vh flip bits)

    // pixel data follows header

} TGA_HEADER;

MOST COMPILERS make it:
typedef struct
{
    byte  identsize;          // size of ID field that follows 18 byte header (0 usually)
    byte  colourmaptype;      // type of colour map 0=none, 1=has palette
    byte  imagetype;          // type of image 0=none,1=indexed,2=rgb,3=grey,+8=rle packed
    byte __UNNAMED_PADDING_1;  // make next member start on 2 byte boundary

    short colourmapstart;     // first colour map entry in palette
    short colourmaplength;    // number of colours in palette
    byte  colourmapbits;      // number of bits per palette entry 15,16,24,32
    byte __UNNAMED_PADDING_2;  // make next member start on 2 byte boundary

    short xstart;             // image x origin
    short ystart;             // image y origin
    short width;              // image width in pixels
    short height;             // image height in pixels
    byte  bits;               // image bits per pixel 8,16,24,32
    byte  descriptor;         // image descriptor bits (vh flip bits)

    // pixel data follows header

} TGA_HEADER;

making the total size 20 bytes.  watch out for this in your code.
The previously cited msdn article is GONE. I didn’t know microsoft did that, but its REALLY annoying.
概要 Overview
詳細 Details
サンプルコード Sample code
関連情報 Related Information
すべて展開する | すべて折りたたむ Expand All | Collapse All
概要 Overview Microsoft Windows NT 4.0 と Microsoft Windows 98 は、マウスがウィンドウを離れたことをウィンドウに通知する TrackMouseEvent API を提供しています。 Microsoft Windows NT 4.0 and Microsoft Windows 98, to notify the window that the mouse off the window TrackMouseEvent API provides. Windows 95 では、このような通知方法を提供していません。 Windows 95 does not provide this notification method. アプリケーションは、マウスがウィンドウ内に入った時にタイマーを起動し、そのタイマーを使ってマウスの位置を監視して、ウィンドウ範囲内にあるかを判断することによって、マウスがウィンドウ外に出たことを検出できます。 Application, start the timer when the mouse enters the window, to monitor the position of the mouse using a timer, or by a judge within the window, out the window that the mouse can be detected.
 先頭へ戻る Back to the top
詳細 Details 以下のサンプルコードは、TrackMouseEvent のインタフェースを使うように、Windows NT3.51 と Windows 95 で、マウスが離れたことを検出する方法を示した例です。 The following sample code, TrackMouseEvent to use interface, Windows NT3.51 with Windows 95, is an example of how to detect that the mouse away. WM_MOUSEHOVER の機能の実現は読者にお任せいたします。 We realize the function of WM_MOUSEHOVER leave it to your readers.
 先頭へ戻る Back to the top
サンプルコード Sample code
    #if(_WIN32_WINNT < 0x0400) # if (_WIN32_WINNT cbSize  cbSize hwndTrack)) { if (! IsWindow (ptme-> hwndTrack)) (
          OutputDebugString( OutputDebugString (
             TEXT("TrackMouseEvent: invalid hwndTrack\n")); TEXT ( "TrackMouseEvent: invalid hwndTrack \ n"));
          return FALSE; return FALSE;
       } )

       if (!(ptme->dwFlags & TME_LEAVE)) { if (! (ptme-> dwFlags & TME_LEAVE)) (
          OutputDebugString(TEXT("TrackMouseEvent: invalid dwFlags\n")); OutputDebugString (TEXT ( "TrackMouseEvent: invalid dwFlags \ n"));
          return FALSE; return FALSE;
       } )

       return SetTimer(ptme->hwndTrack, ptme->dwFlags, return SetTimer (ptme-> hwndTrack, ptme-> dwFlags,
                       100,(TIMERPROC)TrackMouseTimerProc); 100, (TIMERPROC) TrackMouseTimerProc);
    } )
    #endif # endif

    LRESULT CALLBACK LRESULT CALLBACK
    MainWndProc(HWND hWnd, UINT uMsg, WPARAM wParam, LPARAM lParam) MainWndProc (HWND hWnd, UINT uMsg, WPARAM wParam, LPARAM lParam)
    { (
       TRACKMOUSEEVENT tme; TRACKMOUSEEVENT tme;
       static BOOL fInWindow; static BOOL fInWindow;
       static BOOL fInMenu; static BOOL fInMenu;
       switch (uMsg) { switch (uMsg) (
          case WM_CREATE: case WM_CREATE:
             fInWindow = FALSE; fInWindow = FALSE;
             fInMenu = FALSE; fInMenu = FALSE;
             return 0; return 0;

          case WM_MOUSEMOVE: case WM_MOUSEMOVE:
             if (!fInWindow) { if (! fInWindow) (
                fInWindow = TRUE; fInWindow = TRUE;
                tme.cbSize = sizeof(TRACKMOUSEEVENT); tme.cbSize = sizeof (TRACKMOUSEEVENT);
                tme.dwFlags = TME_LEAVE; tme.dwFlags = TME_LEAVE;
                tme.hwndTrack = hWnd; tme.hwndTrack = hWnd;
                if (!TrackMouseEvent(&tme)) { if (! TrackMouseEvent (& tme)) (
                   MessageBox(hWnd, MessageBox (hWnd,
                              TEXT("TrackMouseEvent Failed"), TEXT ( "TrackMouseEvent Failed"),
                              TEXT("Mouse Leave"),MB_OK); TEXT ( "Mouse Leave"), MB_OK);
                } )
             } )
          break;

          case WM_MOUSELEAVE: case WM_MOUSELEAVE:
             fInWindow = FALSE; fInWindow = FALSE;
             if (!fInMenu) if (! fInMenu)
                MessageBox(hWnd,TEXT("Elvis has left the building"), MessageBox (hWnd, TEXT ( "Elvis has left the building"),
                           TEXT("Mouse Leave"),MB_OK); TEXT ( "Mouse Leave"), MB_OK);
             break;
          case WM_ENTERMENULOOP: case WM_ENTERMENULOOP:
             fInMenu = TRUE; fInMenu = TRUE;
             break;

          case WM_EXITMENULOOP: case WM_EXITMENULOOP:
             fInMenu = FALSE; fInMenu = FALSE;
             break;

          default:
             return DefWindowProc(hWnd,uMsg,wParam,lParam); return DefWindowProc (hWnd, uMsg, wParam, lParam);
       } )
       return FALSE; return FALSE;
    } )

   (c) Microsoft Corporation 1997, All Rights Reserved. (c) Microsoft Corporation 1997, All Rights Reserved.
   Contributions by Rob Caplan, Microsoft Corporation Contributions by Rob Caplan, Microsoft Corporation


 先頭へ戻る Back to the top
関連情報 Related Information この資料は米国 Microsoft Corporation から提供されている Knowledge Base の Article ID 183107 (http://support.microsoft.com/kb/183107/EN-US/ ) (最終更新日 1999-02-22) をもとに作成したものです。 Microsoft Corporation on this article are available from the Knowledge Base Article ID 183107 (http://support.microsoft.com/kb/183107/EN-US/) (Last Updated 1999-02-22) based on what you think.


 先頭へ戻る Back to the top

--------------------------------------------------------------------------------

この資料は以下の製品について記述したものです。 This article was first listed in the following table.
Microsoft Platform SDK January 2000 Edition Microsoft Platform SDK January 2000 Edition
Microsoft Windows NT Server 3.5 Microsoft Windows NT Server 3.5
Microsoft Windows NT Server 3.51 Microsoft Windows NT Server 3.51
Microsoft Windows NT Server 4.0 Standard Edition Microsoft Windows NT Server 4.0 Standard Edition
Microsoft Windows NT Workstation 3.5 Microsoft Windows NT Workstation 3.5
Microsoft Windows NT Workstation 3.51 Microsoft Windows NT Workstation 3.51
Microsoft Windows NT Workstation 4.0 Developer Edition Microsoft Windows NT Workstation 4.0 Developer Edition
Microsoft Windows 95 Microsoft Windows 95
Microsoft Windows 98 Standard Edition Microsoft Windows 98 Standard Edition
Microsoft Windows 2000 Advanced Server Microsoft Windows 2000 Advanced Server
Microsoft Windows 2000 Server Microsoft Windows 2000 Server
Microsoft Windows 2000 Professional Microsoft Windows 2000 Professional
 先頭へ戻る Back to the top
キーワード: Keywords:  kbinfo trackmouseevent KB183107 kbinfo trackmouseevent KB183107

 先頭へ戻る Back to the top
"Microsoft Knowledge Baseに含まれている情報は、いかなる保証もない現状ベースで提供されるものです。Microsoft Corporation及びその関連会社は、市場性および特定の目的への適合性を含めて、明示的にも黙示的にも、一切の保証をいたしません。さらに、Microsoft Corporation及びその関連会社は、本文書に含まれている情報の使用及び使用結果につき、正確性、真実性等、いかなる表明・保証も行ないません。Microsoft Corporation、その関連会社及びこれらの権限ある代理人による口頭または書面による一切の情報提供またはアドバイスは、保証を意味するものではなく、かつ上記免責条項の範囲を狭めるものではありません。Microsoft Corporation、その関連会社 及びこれらの者の供給者は、直接的、間接的、偶発的、結果的損害、逸失利益、懲罰的損害、または特別損害を含む全ての損害に対して、状況のいかんを問わず一切責任を負いません。(Microsoft Corporation、その関連会社 またはこれらの者の供給者がかかる損害の発生可能性を了知している場合を含みます。) 結果的損害または偶発的損害に対する責任の免除または制限を認めていない地域においては、上記制限が適用されない場合があります。なお、本文書においては、文書の体裁上の都合により製品名の表記において商標登録表示、その他の商標表示を省略している場合がありますので、予めご了解ください。" "Microsoft Knowledge Base that contains the information is provided by the base warranty of any kind. Microsoft Corporation and its affiliates, including times for this problem, explicitly in Brazil, and more. In addition, Microsoft Corporation and their affiliates, to use of the information contained in this document, the accuracy, truth, and to Reproduce section also. Microsoft Corporation, or advice of any information provided orally or in writing the power of these are not the top, click the above disclaimer and do not . Microsoft Corporation, the reliability of these are direct, indirect, accidental, consequential damage, lost profits, punitive damages, including damages for loss of or all the circumstances not be responsible for any. (Microsoft Corporation, then you will have the possibility of such damages the reliability of the computer.) accidental or consequential damage In the current exemption of liability for damages, you may not click OK. Microsoft is a registered trademark shown in the name of the product represented by the top Keywords: Other We may have to skip the show, please OK. "
The only article like it I could find is this one, translated from japanese
WM_MOUSELEAVE notification on msdn now.
She picks a song out of a hat and does that song the next week.
I like her voice.
A bunch of pointers to helpful C pages
//////////////////////////////////////////
//                                      //
// OpenGL in a PROPER Windows APP       //
// ( NO GLUT !! )                       //
//                                      //
// You found this at bobobobo's weblog, //
// https://bobobobo.wordpress.com        //
//                                      //
// Creation date:  Feb 9/08             //
// Last modified:  Feb 10/08            //
//                                      //
//////////////////////////////////////////

#include <windows.h>
#include <stdio.h>
#include <stdlib.h>
#include <math.h>
#include <gl/gl.h>
#include <gl/glu.h>

#pragma comment(lib, "opengl32.lib")
#pragma comment(lib, "glu32.lib")


////////////////////////
// OK, here's the deal.
//
// OpenGL is typically so hard to
// get started on Windows (what, with the
// HDC and the HGLRC and the PIXELFORMATDESCRIPTOR)
// most get turned off very quickly
// and stick with GLUT for a very long time,
// because GLUT hides away A LOT of the
// complexities of getting a window up
// and drawing into it.

// If you're still reading, you're
// probably tired of doing things the
// GLUT way, and you want to cross over
// to doing things in OpenGL using a pure
// Windows application.

// Good choice my friend!  If you want
// full control over your app, you'll
// want to do things in pure Win32.

// Once you get used to programming in Win32,
// its not ALL THAT BAD, I promise (evil grin).

// This demo shows you how to get a basic
// window up that OpenGL can draw into,
// and explains each step in detail.

// I give some additional references at the
// bottom of the page.

//////////////////////////
// OVERVIEW:
//
// The OUTPUT of OpenGL is a two dimensional
// PICTURE of a 3D scene.

// That's right.  I said 2D.

// People often say that the process OpenGL
// goes through to render a 3D scene is just like
// a CAMERA TAKING A PHOTOGRAPH OF A REAL WORLD SCENE.
//
// So, you know obviously that a PHOTOGRAPH
// is PURELY 2D after its been developed,
// and it DEPICTS the 3D scene that it
// "took a picture" of accurately.

// That's exactly what OpenGL does.  OpenGL's JOB
// is to take all your instructions, all your
// glColor3f()'s and your glVertex3f()'s, and
// to ultimately end up DRAWING A 2D PICTURE
// from those instructions that can be displayed
// on a computer screen.

// In THIS program, our MAIN GOAL is to
// CONNECT UP the OUTPUT of OpenGL (that 2D
// image OpenGL produces)
// with YOUR APPLICATION'S WINDOW.

// Does this look familiar?

/*
     HDC hdc = GetDC( hwnd );
*/

// You should already know that the way
// you as a Windows programmer draw to
// your application's window is using
// your window's HDC.

// If this doesn't sound familiar,
// then I strongly recommend you go read up
// on Win GDI before continuing!

////////////////////////////////!
//
// So if our way to draw to our application window
// is the HDC, and OpenGL produces some 2D image
// HOW IN THE WORLD DO YOU CONNECT UP the OUTPUT
// of the OpenGL program (that 2D picture)
// WITH the HDC of a WINDOW?
//
// That's the main subject we're tackling here
// in this tutorial.
//
// And its EASY.
//
// WE'RE lucky.  Microsoft created a bunch
// of functions (all beginning with "wgl"),
// that make this job of "connecting up" the output
// of OpenGL with the HDC of our window quite easy!

/////////////////////////
// BIG PICTURE:
//
// Here's the big picture of what
// we're going to be doing here:

/*

|---------|  draws to   |-------|  copied out   |---------|  shows in  |-----------|
|         | ==========> |       | ============> |         | =========> |           |
|---------|             |-------|               |---------|            |-----------|
  OPENGL                  HGLRC                     HDC                 application
 FUNCTION                                                                 window
  CALLS

*/

//////////////////////
// In code:  this is the steps
// we'll follow.
//
// 1.  CREATE WINDOW AS USUAL.
//
// 2.  GET DC OF WINDOW.
//     Get the HDC of our window using a line like:
//          hdc = GetDC( hwnd );
//
// 3.  SET PIXEL FORMAT OF HDC.
//     You do 3 things here:
//          Create a PFD ('pixel format descriptor')
//          ChoosePixelFormat()
//          SetPixelFormat()
//
// 4.  CREATE RENDERING CONTEXT (HGLRC).
//          wglCreateContext()
//     Create the surface to which OpenGL
//     shall draw.  It is created such that
//     it shall be completely compatible
//     with the DC of our window, (it will
//     use the same pixel format!)
//
// 5.  CONNECT THE RENDER CONTEXT (HGLRC)
//     WITH THE DEVICE CONTEXT (HDC) OF WINDOW.
//          wglMakeCurrent()
//
// 6.  DRAW USING OPENGL.
//          glVertex3d(); glColor3d(); // ETC!
//     You call OpenGL functions to perform
//     your drawing!  OpenGL will spit out
//     its result picture to the HGLRC, which is
//     connected to the backbuffer of your HDC.
//
// 7.  SWAP BUFFERS.
//          SwapBuffers( hdc );
//     Assuming you've picked a DOUBLE BUFFERED
//     pixel format all the way back in step 2,
//     you'll need to SWAP the buffers so that
//     the image you've created using OpenGL on
//     the backbuffer of your hdc is shown
//     in your application window.

// And that's all!

// Ready for the code??? Let's go!

/////////////////////
// GLOBALS
//
/// Define a structure to hold all
/// of the global variables of this app.
struct Globals
{
    HINSTANCE hInstance;    // window app instance

    HWND hwnd;      // handle for the window

    HDC   hdc;      // handle to device context

    HGLRC hglrc;    // handle to OpenGL rendering context

    int width, height;      // the desired width and
    // height of the CLIENT AREA
    // (DRAWABLE REGION in Window)
};


///////////////////////////
// GLOBALS
// declare one struct Globals called g;
Globals g;
//
///////////////////////////


// Function prototypes.
LRESULT CALLBACK WndProc( HWND hwnd, UINT message, WPARAM wparam, LPARAM lparam );
int WINAPI WinMain( HINSTANCE hInstance, HINSTANCE hPrevInstance, LPSTR szCmdLine, int iCmdShow );
void draw();            // drawing function containing OpenGL function calls

////////////////////////////
// In a C++ Windows app, the starting point is WinMain().
int WINAPI WinMain( HINSTANCE hInstance, HINSTANCE hPrevInstance, LPSTR szCmdLine, int iCmdShow )
{
    //////////////////
    // First we'll start by saving a copy of
    // the hInstance parameter inside our
    // "glob" of globals "g":
    g.hInstance = hInstance;

    #pragma region part 1 - create a window
    // The next few lines you should already
    // be used to:  create a WNDCLASS
    // that describes the properties of
    // the window we're going to soon create.
    // A.  Create the WNDCLASS
    WNDCLASS wc;
    wc.cbClsExtra = 0;
    wc.cbWndExtra = 0;
    wc.hbrBackground = (HBRUSH)GetStockObject( BLACK_BRUSH );
    wc.hCursor = LoadCursor( NULL, IDC_ARROW );
    wc.hIcon = LoadIcon( NULL, IDI_APPLICATION );
    wc.hInstance = hInstance;
    wc.lpfnWndProc = WndProc;
    wc.lpszClassName = TEXT("Philip");
    wc.lpszMenuName = 0;
    wc.style = CS_HREDRAW | CS_VREDRAW | CS_OWNDC;

    // Register that class with the Windows O/S..
	RegisterClass(&wc);

    /////////////////
    // Ok, AT THIS POINT, we'd normally
    // just go ahead and call CreateWindow().
    // And we WILL call CreateWindow(), but
    // there is something I must explain to
    // you first.  That thing is the RECT structure.

    /////////////////
    // RECT:
    //
    // A RECT is just a C struct meant to represent
    // a rectangle.
    //
    // The RECT structure WILL DESCRIBE EXACTLY WHERE
    // AND HOW WE WANT OUR WINDOW TO APPEAR WHEN WE
    // CREATE IT.
    //
    //         TOP
    //       --------
    //       |      |
    // LEFT  |      | RIGHT
    //       --------
    //        BOTTOM
    //
    // So, what we do is, we create the RECT
    // struct for our window as follows:
    RECT rect;
    SetRect( &rect, 50,  // left
                    50,  // top
                    850, // right
                    650 ); // bottom

    // Save width and height off.
    g.width = rect.right - rect.left;
    g.height = rect.bottom - rect.top;

    // Adjust it.
    AdjustWindowRect( &rect, WS_OVERLAPPEDWINDOW, false );

    // AdjustWindowRect() expands the RECT
    // so that the CLIENT AREA (drawable region)
    // has EXACTLY the dimensions we specify
    // in the incoming RECT.

    // If you didn't just understand that, understand
    // this:  "you have to call AdjustWindowRect()",
    // and move on.  Its not THAT important, but its
    // good for the performance of your app.

    ///////////////////
    // NOW we call CreateWindow, using
    // that adjusted RECT structure to
    // specify the width and height of the window.
    g.hwnd = CreateWindow(TEXT("Philip"),
                          TEXT("GL WINDOW!"),
                          WS_OVERLAPPEDWINDOW,
                          rect.left, rect.top,  // adjusted x, y positions
                          rect.right - rect.left, rect.bottom - rect.top,  // adjusted width and height
                          NULL, NULL,
                          hInstance, NULL);

    // check to see that the window
    // was created successfully!
    if( g.hwnd == NULL )
    {
        FatalAppExit( NULL, TEXT("CreateWindow() failed!") );
    }

    // and show.
    ShowWindow( g.hwnd, iCmdShow );
    #pragma endregion

    #pragma region part 2 - Get DC of window we just made
    //2.  GET DC OF WINDOW, and keep it in our global
    //    variable g.  We will NOT release this DC
    //    until our app is about to exit.
    g.hdc = GetDC( g.hwnd );

    // If this keeping-DC-for-life-of-program-thing
    // disturbs you as much as it disturbed me,
    // GOOD LUCK in finding MS-based documentation to validate
    // this practice!  All examples I've seen and
    // Astle's OpenGL gaming book do it this way,
    // so. . . I suppose its ok.

    // One of the things I make sure to do is to specify
    // CS_OWNDC when I create the window,
    // so that Windows maintains a separate device context
    // for my application's window.

    // I haven't run into problems with this.  I don't
    // think you should either.
    #pragma endregion

    #pragma region part 3 - SET PIXEL FORMAT OF HDC
    //3.  SET PIXEL FORMAT OF HDC.
    //
    // We now have to set up the PIXELFORMAT
    // of our HDC.

    // A PIXEL FORMAT just describes the
    // "qualities" that each pixel in the
    // window will have.  Do you want your
    // OpenGL app to use 24 bit color
    // ("true color" -- really high
    // quality!)?  Or 16 bit color (can look
    // a bit washed out)?

    // There are 3 substeps here:
    //    A> create the PFD and set it up to describe
    //       the pixel format we DESIRE (dream of having!)
    //
    //    B> call ChoosePixelFormat() to make windows
    //       choose us the ID of the appropriate pixel format that
    //       is CLOSEST to our dream pixel format.
    //
    //    C> Call SetPixelFormat() using the integer ID number
    //       that ChoosePixelFormat() returned to us in step B>

    // So let's do that:

    ////////////////////
    // A> CREATE PFD:
    PIXELFORMATDESCRIPTOR pfd = { 0 };  // create the pfd,
    // and start it out with ALL ZEROs in ALL
    // of its fields.

    // A good description of the PIXELFORMATDESCRIPTOR
    // struct is under the documentation
    // for the ChoosePixelFormat() function:
    // http://msdn2.microsoft.com/en-us/library/ms537556(VS.85).aspx

    // If you look at the docs, MANY of the fields
    // are "NOT USED" and REMAIN 0.

    // That should be something of a relief to you!
    // Look at the number of fields in this beast!

    // So we set only the fields of the pfd we care about:
    pfd.nSize = sizeof( PIXELFORMATDESCRIPTOR );    // just its size
    pfd.nVersion = 1;   // always 1

    pfd.dwFlags = PFD_SUPPORT_OPENGL |  // OpenGL support - not DirectDraw
                  PFD_DOUBLEBUFFER   |  // double buffering support
                  PFD_DRAW_TO_WINDOW;   // draw to the app window, not to a bitmap image

    pfd.iPixelType = PFD_TYPE_RGBA ;    // red, green, blue, alpha for each pixel
    pfd.cColorBits = 24;                // 24 bit == 8 bits for red, 8 for green, 8 for blue.
                                        // This count of color bits EXCLUDES alpha.

    pfd.cDepthBits = 32;                // 32 bits to measure pixel depth.  That's accurate!

    ///////////////////
    // B> Alright!  We've filled out the pfd
    // and it describes the way we want
    // our pixels to appear on the screen.
    //
    // Now this next step is a little bit weird.
    // The thing is, there are only a couple of
    // dozen ACCEPTABLE pixel formats in existence.
    //
    // In other words, the system MIGHT NOT
    // be able to use a pixel format the likes
    // of which you have described in your
    // PIXELFORMATDESCRIPTOR.

    // What to do?? It would be awful annoying
    // to have to keep TRYING different
    // PIXELFORMATDESCRIPTORS until we found
    // one that actually WORKED on this system.

    // So MSFT has a better solution.

    // We'll make a call to a function called
    // ChoosePixelFormat().  ChoosePixelFormat()
    // will examine the PIXELFORMATDESCRIPTOR
    // structure that you send it, then it will
    // give you back an ID for the pixel format
    // that MOST CLOSELY MATCHES the pixel format you
    // SAID you wanted.

    int chosenPixelFormat = ChoosePixelFormat( g.hdc, &pfd );
    // what comes back from ChoosePixelFormat() is
    // an integer identifier for a specific pixel
    // format that Windows ALREADY knows about.
    // If you got 0 back, then there was an error.
    if( chosenPixelFormat == 0 )
    {
        FatalAppExit( NULL, TEXT("ChoosePixelFormat() failed!") );
    }

    char b[100];
    sprintf(b, "You got ID# %d as your pixelformat!\n", chosenPixelFormat);
    MessageBoxA( NULL, b, "Your pixelformat", MB_OK );

    /////////////////
    // C> So finally, we call SetPixelFormat() using the integer ID number
    // that ChoosePixelFormat() returned to us previously.
    int result = SetPixelFormat( g.hdc, chosenPixelFormat, &pfd );

    if (result == NULL)
    {
        FatalAppExit( NULL, TEXT("SetPixelFormat() failed!") );
    }
    // and that's all there is to setting
    // the pixel format!
    //////////
    #pragma endregion

    #pragma region part 4 - CREATE THE RENDERING CONTEXT
    //4.  CREATE RENDERING CONTEXT (HGLRC).

    // What's a rendering context?
    // Its the "surface" that OpenGL
    // will DRAW to.

    // The HGLRC will be created
    // such that it is COMPATIBLE
    // with the hdc.

    g.hglrc = wglCreateContext( g.hdc );
    // Created the rendering context
    // and saved handle to it in global 'g'.
    //
    // Wasn't that awfully easy to create
    // such a complicated sounding thing?
    ///////////////
    #pragma endregion

    #pragma region part 5 - CONNECT THE RENDERING CONTEXT WITH THE DEVICE CONTEXT OF THE WINDOW
    //5.  CONNECT THE RENDER CONTEXT (HGLRC)
    //    WITH THE DEVICE CONTEXT (HDC) OF WINDOW.
    wglMakeCurrent( g.hdc, g.hglrc );

    //
    // OPEN GL INIT COMPLETED!!
    ////////////////////////////
    #pragma endregion

    #pragma region message loop
    MSG msg;

    while( 1 )
    {
        if( PeekMessage( &msg, NULL, 0, 0, PM_REMOVE ) )
        {
            if( msg.message == WM_QUIT )
            {
                break;
            }

            TranslateMessage( &msg );
            DispatchMessage( &msg );
        }
        else
        {
            //6.  DRAW USING OPENGL.
            // This region right here is the
            // heart of our application.  THE MOST
            // execution time is spent just repeating
            // this draw() function.
            draw();
        }
    }
    #pragma endregion

    //////////////
    // clean up
    #pragma region clean up
    // UNmake your rendering context (make it 'uncurrent')
    wglMakeCurrent( NULL, NULL );

    // Delete the rendering context, we no longer need it.
    wglDeleteContext( g.hglrc );

    // release your window's DC
    ReleaseDC( g.hwnd, g.hdc );
    #pragma endregion

    // and a cheesy fade exit
    AnimateWindow( g.hwnd, 200, AW_HIDE | AW_BLEND );

    return msg.wParam;
}

////////////////////////
// DRAWING FUNCTION
void draw()
{
    // 1. set up the viewport
    glViewport(0, 0, g.width, g.height); // set viewport
    // to be the whole width and height
    // of the CLIENT AREA (drawable region) of the window,
    // (the CLIENT AREA excludes the titlebar and the
    // maximize/minimize buttons).

    // 2. projection matrix
    glMatrixMode(GL_PROJECTION);
    glLoadIdentity();
    gluPerspective(45.0,(float)g.width/(float)g.height, 1, 1000);

    // 3. viewing transformation
    glMatrixMode(GL_MODELVIEW);
    glLoadIdentity();

    gluLookAt(  0, 0, 10,
                0, 0, 0,
                0, 1, 0);

    // 4. modelling transformation and drawing
    glClearColor( 0.5, 0, 0, 0 );
    glClear( GL_COLOR_BUFFER_BIT | GL_DEPTH_BUFFER_BIT );

    static float i = 0.01f;
    // Notice that 'i' is a STATIC variable.
    // That's very important. (imagine me saying
    // that like Conchords in "Business Time")
    // http://youtube.com/watch?v=WGOohBytKTU

    // A 'static' variable is created ONCE
    // when the function in which it sits first runs.

    // The static variable will "LIVE ON"
    // between seperate calls to the function
    // in which it lives UNTIL THE PROGRAM ENDS.

    i+= 0.001f;     // increase i by 0.001 from its
    // it had on the LAST FUNCTION CALL to the draw() function

    float c = cos( i );
    float s = sin( i );

    glBegin (GL_TRIANGLES);
        glColor3f(  c, 0, 0 );      // red
        glVertex3f( 1+c, 0+s, 0 );

        glColor3f(  c, s, 0 );      // yellow
        glVertex3f( 0+c, 1+s, 0 );

        glColor3f(  s, 0.1f, s );   // magenta
        glVertex3f(-1+c, 0+s, 0 );
    glEnd();

    //7.  SWAP BUFFERS.
    SwapBuffers(g.hdc);
    // Its important to realize that the backbuffer
    // is intelligently managed by the HDC ON ITS OWN,
    // so all's you gots to do is call SwapBuffers
    // on the HDC of your window.
}


////////////////////////
// WNDPROC
// Notice that WndProc is very very neglected.
// We hardly do anything with it!  That's because
// we do all of our processing in the draw()
// function.
LRESULT CALLBACK WndProc(   HWND hwnd, UINT message, WPARAM wparam, LPARAM lparam )
{
    switch( message )
    {
    case WM_CREATE:
        Beep( 50, 10 );
        return 0;
        break;

    case WM_PAINT:
        {
            HDC hdc;
            PAINTSTRUCT ps;
            hdc = BeginPaint( hwnd, &ps );
                // don't draw here.  would be waaay too slow.
                // draw in the draw() function instead.
            EndPaint( hwnd, &ps );
        }
        return 0;
        break;

    case WM_KEYDOWN:
        switch( wparam )
        {
        case VK_ESCAPE:
            PostQuitMessage( 0 );
            break;
        default:
            break;
        }
        return 0;

    case WM_DESTROY:
        PostQuitMessage( 0 ) ;
        return 0;
        break;
    }

    return DefWindowProc( hwnd, message, wparam, lparam );
}


////////////////
// END NOTES:
//
// Some good references:
// WGL function ref on MSDN:
// http://msdn2.microsoft.com/en-us/library/ms673957%28VS.85%29.aspx

// MSDN example from 1994 (but still good!)
// "OpenGL I: Quick Start"
// http://msdn2.microsoft.com/en-us/library/ms970745.aspx


//////////////////
// QUICK Q&A (make sure you know what's going on):
//
// QUESTION:  What's the means by which we can draw
//            to our window itself?
//
// ANSWER:  The HDC (HANDLE TO DEVICE CONTEXT).

// QUESTION:  What's the means by which OpenGL can
//            draw to the window?
//
// ANSWER:  USING that SAME HDC WE woulda used
//          to draw to it!! (more to come on this now).

/////////////////////
// It IS possible to access the bits
// of the output of OpenGL in 2 ways:
//      1)  Use glReadPixels() to obtain
//          the arrayful of pixels on the
//          screen.  You can then save this
//          to a .TGA or .BMP file easily.

//      2)  Render to a BITMAP, then
//          blit that bitmap to your HDC.
//          There's a 1995 msdn article on this:
//          "OpenGL VI: Rendering on DIBs with PFD_DRAW_TO_BITMAP"
//          http://msdn2.microsoft.com/en-us/library/ms970768.aspx


/*
     ____   __   __      __   __  ___
    / _  \ /  / /  /    /  /  \ \/  /
   / _/ / /  / /  /    /  /    \   /
  / _/ \ /  / /  /__  /  /__   /  /
 /_____//__/ /______//______/ /__/

*/
Download the Visual Studio 2005 project files hosted by esnips! (thanks esnips!)
To intercept the screensaver on Win32, you trap the WM_SYSCOMMAND message in your WndProc, then you check the value of wparam. SC_SCREENSAVE is the screensaver and SC_MONITORPOWER is that windowsy force that wants to shut off the monitor to save power.
To disable either, just return 0 from the event handler function under those cases.
Example:
// This is a piece of WNDPROC:
LRESULT CALLBACK WndProc(   HWND hwnd, UINT message, WPARAM wparam, LPARAM lparam )
{
    switch( message )
    {
    .
    .
    .
        case WM_SYSCOMMAND:
        {
            // There is a system command
            // wparam has the exact command type that it is
            switch( wparam )
            {
                case SC_MOVE:
                    printf("You're moving the window!\n");
                    // don't interfere with this one, otherwise your window
                    // won't move normally when the user tries to move it!
                    break;

                case SC_SCREENSAVE:     // screensaver wants to begin

                    return 0;           // returning 0 PREVENTS those things from happening
                    // Note about SC_SCREENSAVE:
                    // Try this.  Go into your settings and change
                    // your screensaver to start after 1 minute.
                    // Then run this program and sit and wait
                    // for the 1 minute.

                    // The funny thing about this, is Windows will
                    // keep trying to enter screen saver mode,
                    // by sending your app a "message" every
                    // half a second or so.

                    // If all you do is return 0; from this
                    // part, your app will keep on stopping
                    // the screensaver from starting.  And
                    // Windows will keep asking if it can
                    // start the screen saver or not, until
                    // the user does something to reset the
                    // screensaver-turn-on timer like move the mouse
                    // or press a key on the keyboard.

                    // if you wait even longer, the same thing
                    // happens with SC_MONITORPOWER, except
                    // you keep getting 2 messages now.

                    case SC_MONITORPOWER:   // monitor wants to shut off - powersaver mode
                        return 0;           // returning 0 PREVENTS monitor from turning off
            } // end wparam inner switch
        } //end case WM_SYSCOMMAND
            .
            .
            .
    } // end switch(message)
} // end WndProc
MSDN is awkward to navigate. The cryptic URLs don’t help either.
This is a listing of refs that I don’t want to lose or spend time looking for again:
RECT r ;
GetClientRect( hwnd, &r ) ;
int width = r.right - r.left ;

// OR
GetWindowRect( hwnd, &r ) ;
width = r.right - r.left ;
Use ScreenToClient().
EnumChildWindows(). Use is a bit complicated (callbacks and all), but it works.
Here’s a GDI+ hit test ref as well
Very useful are:
and
WS_BORDER WS_CAPTION WS_CHILDWINDOW WS_MAXIMIZEBOX WS_MINIMIZEBOX WS_OVERLAPPED WS_OVERLAPPEDWINDOW WS_POPUP WS_POPUPWINDOW (and more!)
CS_BYTEALIGNCLIENT CS_BYTEALIGNWINDOW CS_CLASSDC CS_DBLCLKS CS_DROPSHADOW CS_GLOBALCLASS CS_HREDRAW CS_NOCLOSE CS_OWNDC CS_PARENTDC CS_SAVEBITS CS_VREDRAW
GET_X_LPARAM GET_Y_LPARAM HIBYTE HIWORD LOBYTE LOWORD MAKELONG MAKELPARAM MAKELRESULT MAKEWORD MAKEWPARAM
Also don’t forget about the MAKEPOINTS macro.
WM_ACTIVATEAPP WM_CANCELMODE WM_CHILDACTIVATE WM_CLOSE WM_COMPACTING WM_CREATE WM_DESTROY WM_ENABLE WM_ENTERSIZEMOVE WM_EXITSIZEMOVE WM_GETICON WM_GETMINMAXINFO WM_INPUTLANGCHANGE WM_INPUTLANGCHANGEREQUEST WM_MOVE WM_MOVING WM_NCACTIVATE WM_NCCALCSIZE WM_NCCREATE WM_NCDESTROY WM_NULL WM_PARENTNOTIFY WM_QUERYDRAGICON WM_QUERYOPEN WM_SHOWWINDOW WM_SIZE WM_SIZING WM_STYLECHANGED WM_STYLECHANGING WM_THEMECHANGED WM_USERCHANGED WM_WINDOWPOSCHANGED WM_WINDOWPOSCHANGING
SC_CLOSE SC_CONTEXTHELP SC_DEFAULT SC_HOTKEY SC_HSCROLL SC_KEYMENU SC_MAXIMIZE SC_MINIMIZE SC_MONITORPOWER SC_MOUSEMENU SC_MOVE SC_NEXTWINDOW SC_PREVWINDOW SC_RESTORE SC_SCREENSAVE SC_SIZE SC_TASKLIST SC_VSCROLL
WM_COMMAND WM_CONTEXTMENU WM_ENTERMENULOOP WM_EXITMENULOOP WM_GETTITLEBARINFOEX WM_MENUCOMMAND WM_MENUDRAG WM_MENUGETOBJECT WM_MENURBUTTONUP WM_NEXTMENU WM_UNINITMENUPOPUP
WM_ACTIVATE WM_APPCOMMAND WM_CHAR WM_DEADCHAR WM_HOTKEY WM_KEYDOWN WM_KEYUP WM_KILLFOCUS WM_SETFOCUS WM_SYSDEADCHAR WM_SYSKEYDOWN WM_SYSKEYUP WM_UNICHAR
WM_CAPTURECHANGED WM_LBUTTONDBLCLK WM_LBUTTONDOWN WM_LBUTTONUP WM_MBUTTONDBLCLK WM_MBUTTONDOWN WM_MBUTTONUP WM_MOUSEACTIVATE WM_MOUSEHOVER WM_MOUSEHWHEEL WM_MOUSELEAVE WM_MOUSEMOVE WM_MOUSEWHEEL WM_NCHITTEST WM_NCLBUTTONDBLCLK WM_NCLBUTTONDOWN WM_NCLBUTTONUP WM_NCMBUTTONDBLCLK WM_NCMBUTTONDOWN WM_NCMBUTTONUP WM_NCMOUSEHOVER WM_NCMOUSELEAVE WM_NCMOUSEMOVE WM_NCRBUTTONDBLCLK WM_NCRBUTTONDOWN WM_NCRBUTTONUP WM_NCXBUTTONDBLCLK WM_NCXBUTTONDOWN WM_NCXBUTTONUP WM_RBUTTONDBLCLK WM_RBUTTONDOWN WM_RBUTTONUP WM_XBUTTONDBLCLK WM_XBUTTONDOWN WM_XBUTTONUP
Each of those has descriptions of constants
MK_CONTROL MK_LBUTTON MK_MBUTTON MK_RBUTTON MK_SHIFT MK_XBUTTON1 MK_XBUTTON2
when relevant.
ANIMATE_CLASS DATETIMEPICK_CLASS HOTKEY_CLASS LINK_CLASS MONTHCAL_CLASS NATIVEFNTCTL_CLASS PROGRESS_CLASS REBARCLASSNAME STANDARD_CLASSES STATUSCLASSNAME TOOLBARCLASSNAME TOOLTIPS_CLASS TRACKBAR_CLASS UPDOWN_CLASS WC_BUTTON WC_COMBOBOX WC_COMBOBOXEX WC_EDIT WC_HEADER WC_LISTBOX WC_IPADDRESS WC_LINK WC_LISTVIEW WC_NATIVEFONTCTL WC_PAGESCROLLER WC_SCROLLBAR WC_STATIC WC_TABCONTROL WC_TREEVIEW
(MUST #include <commctrl.h> to use!)
Common Controls demo
zetcode has a good lesson on trackbar
sunjapan has a GREAT page on trackbars. Although this page is dated 1994, its still perfectly 100% relevant!
I couldn’t find similar instruction in the SetWindowsHookEx() “HELP” file, nor in the “Win32 Hooks” article (all that article says is “Filters can tell Windows to discard the message.”) WHY DON’T THEY JUST SAY “Filters can tell Windows to discard the message BY RETURNING TRUE”? That would have saved me the minutes wasted searching.
RichText control Formatting text in a richedit control
This is the 5th edition of a book that was formerly called “Programming Applications For Microsoft Windows” (in its 4th edition) and “Advanced Windows” (in its 3rd edition). Same book, different title each edition that comes out.
This is kind of what happened with Jeff Prosise’s Programming Windows with MFC — going for outrageous prices like $200.00 and such. Copies of the Windows 95 edition of the MFC book are available on Thriftbooks.com right now for $0.39!
I am confuzzled by how software patents work.
It seems that Microsoft takes patents out on a lot of shit. Indeed they even have a patent on the concept of a “taskbar with a start menu”.
But many Linux distros use a very Windows-like UI. And I have seen many example of free software that I would say may “violate” these software patents.
What happens when someone violates a software patent? I can think of a few examples of people that SEEM to be “getting away with it. . .”
Google patents is cool though!
//////////////////////////////////////////
//                                      //
// MOST BASIC GLUT APPLICATION          //
//                                      //
// You found this at bobobobo's weblog, //
// https://bobobobo.wordpress.com        //
//                                      //
// Creation date:  Feb 9/08            //
// Last modified:  Feb 9/08             //
//                                      //
//////////////////////////////////////////

// GLUT is short for "OpenGL Utility Toolkit".
//
// GLUT was originally created by a genius named Mark Kilgard.
//
// GLUT exists only to allow you to easily create a
// window and draw your really cool 3D graphics into that
// window using OpenGL function calls.

// GLUT is NOT really suited to create full blown games,
// and you really should take a look at programming Windows
// if you want to do that.

// BUT, GLUT is a good place to start to understand
// OpenGL in a really simple way.

// GLUT is GREAT for simple projects and demos.

// Its clean, its simple, and it pretty much does
// all the stuff you wanna do in a demo of a short
// program.

///////////////////////////
// GLUT in Visual Studio 2005.

// Here I am explaining how to get GLUT running
// ASSUMING you're using Visual Studio 2005.

// BEFORE STARTING TO RUN THIS PROGRAM:  You must
// first INSTALL GLUT onto your system.
//      TO INSTALL GLUT on your Windows system:
//      1.  Get glut-3.7.6-bin.zip from:
// http://www.xmission.com/~nate/glut.html
//
//      2.  Unzip the file and copy glut32.dll file to:
//C:\Windows\system32
//
//      3.  Copy glut32.lib to:
//C:\Program Files\Microsoft Visual Studio 8\VC\PlatformSDK\Lib
//
//      4.  Copy glut.h to:
//C:\Program Files\Microsoft Visual Studio 8\VC\PlatformSDK\Include\gl

/////////
// Got it installed?  Good!  Let's continue.
/////////


// The first thing we're going to do in our GLUT application is import the
// libraries we'll need:
#include <iostream>  // include the standard
// input/output, so we can write text to the console window
using namespace std;
#include <glut.h>  // include the OpenGL Utility Toolkit
// -- (Remember, you HAVE TO to follow instructions above
// and INSTALL GLUT first!)
#pragma comment( lib, "glut32.lib" ) //!! YOU MUST COMPILE AS A 32-BIT APP TO LINK WITH GLUT
// IMPORTANT:  YOU MUST #include <iostream> BEFORE <glut.h> BEFORE
// OTHERWISE you will get an 'exit' : redefinition error.

/// render function.  This is THE function that
/// TELLS openGL what to DRAW inside our Window.
void render()
{
    glClear( GL_COLOR_BUFFER_BIT );

	#pragma region drawing code
	glPushMatrix();
		glColor3d( 1.0, 1.0, 1.0 );
		glutSolidTeapot( 0.5 );

		glColor3d( 0.0, 0.0, 1.0 );
		glTranslated( 0.0, 0.6, 0.0 );
		glutSolidTeapot( 0.25 );
	glPopMatrix();
	#pragma endregion

    glutSwapBuffers() ;
}

// Next, we'll write our main() function:
int main( int argc, char** argv )
{
/*
A note about argc and argv — CAN skip, but is good to knowNotice that main() has 2 parameters between the brackets. You might not be used to that, because normally we’d just write int main(). It turns out that when you write a GLUT application, you have to have (int argc, char** argv) between the brackets there. Now, you can take my word for it, because its not REALLY important to understanding OpenGL as to why you need argc and argv, or you can read the paragraph below to understand.
argc and argv are the command line arguments. Here’s an example.
Open the Windows command prompt (to open cmd prompt, go to START->Run, then type cmd in the box that appears there. You should see a black console window, like the one that your basic console C++ apps run in. In the black window, after the C:\Documents and Settings> type in this line:
explorerWhat should happen is your windows file explorer should pop up.
Now go back to the command prompt and type in
explorer “C:\Program Files”Notice now that the Windows disk explorer now opens in the folder “C:\Program Files”
In the above example, “C:\Program Files” is a command line argument that modifies the behaviour of the disk explorer upon its launch.
In the same way, your GLUT app will accept a string or two from the operating system environment that tell it how it should set itself up. We never have to deal with argc and argv DIRECTLY in our GLUT apps, but its good to know.
*/
    // Ok, now for the actual code of our program:

    // these next few lines "speak" to GLUT.
    // Think of GLUT like a living entity.
    // Each time you write a function call
    // that begins with glut___(something),
    // you are COMMANDING GLUT to DO SOMETHING.

    // We're going to write SEVEN (7) commands to GLUT in this program.

    glutInit(&argc, argv);              // initialize GLUT!
// (ask GLUT to
// initialize itself and get ready
// to draw graphics)

    glutInitDisplayMode(GLUT_RGB|GLUT_DOUBLE);      // Tell GLUT to
// be prepared to draw in all of red, green and blue
// colors (mixes of red, green and
// blue get you all 16 million
// colors available), Also double buffer the display (REQUIRED windows 7)

    glutInitWindowPosition(120,260);    // this tells GLUT
// that WHEN I decide to create a window,
// I want that Window to start
// up 120 pixels from the left
// edge of the screen, and 260
// pixels from the top edge
// of the screen.

    glutInitWindowSize(600,600);        // This tells GLUT
// that WHEN I create a window, I want
// that window to have a width
// of 600 pixels (first number is
// width), and a height of 600
// pixels (second # is height)


// Next, actually CREATE the window.  Will use
// all the information I specified above about
// window position and window size to
// create this window.
    glutCreateWindow("WOO HOO!  This is my GLUT Window!");

    glutDisplayFunc( render );          // "attach" the
// function with name "render" to
// the "draw" event.  WHENEVER
// my window needs to be "drawn",
// AUTOMATICALLY, GLUT will CALL
// the render() function.

// When does my window need to be
// drawn you ask??  Why, whenever
// it receives a PAINT EVENT from
// the Windows O/S, of course!
// (a window gets a paint event whenever
// the windows O/S recognizes that
// a part of it needs to be redrawn.
// For example, if another window blocks
// your window, and then that
// other window is removed, then
// your window will get a paint event.)

    glutMainLoop();     // START RUNNING THE APP.
    // GOTO render() function.
    // Program is now WAITING for 'messages'
    // from the user, or from the Windows O/S.
    // _PROGRAM CONTROL NEVER RETURNS
    // TO THIS LINE OF CODE AGAIN FOR THE
    // LIFE OF THIS PROGRAM!!_
}


/*
     ____   __   __      __   __  ___
    / _  \ /  / /  /    /  /  \ \/  /
   / _/ / /  / /  /    /  /    \   /
  / _/ \ /  / /  /__  /  /__   /  /
 /_____//__/ /______//______/ /__/

*/
Check out the Visual Studio project files on esnips
//////////////////////////////////////////
//                                      //
// Reading and writing textual data     //
//                                      //
// You found this at bobobobo's weblog, //
// https://bobobobo.wordpress.com        //
//                                      //
// Creation date:  Feb 8/08             //
// Last modified:  Feb 8/08             //
//                                      //
//////////////////////////////////////////
#include <stdio.h>
#include <stdlib.h>

// How do you write to a file in C/C++?
// Its easy!

int main()
{
    ///////////////////
    // fprintf() - stands for File-PRINT-Formatted.
    //
    // Say you've got some TEXTUAL data
    // you want to print out to a simple
    // text file for your program.
    //
    // You know where to turn to.  fprintf() !
    //
    // There are a few steps we must follow here:
    // 1.  OPEN FILE TO WRITE TO
    // 2.  WRITE!
    // 3.  CLOSE THE FILE.

    // 1.  In order to write out to a file, you
    // first have to OPEN A FILE FOR WRITING.
    FILE * outfile = fopen( "shoppingList.txt", "w" );  // open "shoppingList.txt" for "w"RITING
    // 'outfile' is now a "file pointer" to
    // the file "shoppingList.txt" on disk.  outfile
    // can ONLY BE WRITTEN TO, because I opened
    // the file in a WRITE mode, indicated by
    // the "w" as the second argument to fopen()

    // Notice when I call fopen()
        // A.  If "shoppingList.txt" doesn't exist, then
        //     it will be created.

        // B.  If "shoppingList.txt" DOES exist, then
        //     shoppingList.txt's contents are CLEARED OUT

    // 2.  So, now that the file is open, let's write to it!
    fprintf( outfile, "Shopping list:\n" );
    fprintf( outfile, "   - Blueberries\n" );
    fprintf( outfile, "   - Raspberries\n" );
    fprintf( outfile, "   - Granola bars\n" );
    fprintf( outfile, "   - Beer\n" );

    // What if we want to write variable values?
    // Easy!  Just like printf() works, you use
    // the %d, %f, %s to tell fprintf() what types
    // of variables its printing.

    // fprint an int
    int qtips = 5000;
    fprintf( outfile, "   - %d Qtips\n", qtips );

    // fprint a float
    float purity = 99.4;
    fprintf( outfile, "   - Soap that is %.1f%% pure\n", purity );

    // 3.  DONE, so CLOSE THE FILE!
    fclose( outfile );

    ////////////////////
    // HOW DO YOU OPEN A FILE WITHOUT
    // OVERWRITING ITS CONTENTS?
    //
    // 1.  OPEN:  You open the file using "APPEND" mode.
    outfile = fopen( "shoppingList.txt", "a" ); // open "shoppingList.txt" for "a"PPENDING

    // 2.  PRINT:  anything we fprintf() here will automatically be
    // tacked onto the end of "shoppingList.txt"
    fprintf( outfile, "Don't forget the milk !" );

    // 3.  CLOSE!
    fclose( outfile );

    printf("\n\n***************************\n* Part 2 - Reading from a file\n");
    system("pause");
    ////////////////////
    // READING FROM A FILE.
    //
    // Now, we're going to write a bit of code
    // to read that file we just wrote to.

    // Here's how you do it:
    // 1.  OPEN FILE FOR READING
    // 2.  READ!
    // 3.  CLOSE FILE!

    // 1.  OPEN:
    FILE * readfile = fopen( "shoppingList.txt", "r" ); // open "shoppingList.txt" in "r"EAD mode
    char buf[300];      // create a buffer of 300 chars
                        // to temporarily dump data
                        // from the file into.

    while( !feof( readfile ) )
    {
        // 2.  READ!
        // let's read one line at a time
        fgets( buf, 300, readfile );

        // print out that line we just read in
        // to the console so we can see it
        printf( "%s", buf );
    }

    // 3. CLOSE!
    fclose( readfile );


    printf("\nPart 3 - printing the source of __this__ code file.\n");
    system("pause");
    //////////////////
    // A fairly common interview question comes next.
    //
    // "Write a C program that prints out
    // its own source code when it is
    // compiled and run."
    //
    // The trick here about this question is
    // you have to know about the __FILE__ macro.
    //
    // __FILE__ will be automatically identified
    // with a string containing the full path
    // of the source file.
    printf("\nThe source file for this code is:  %s\n", __FILE__ );

    FILE * source = fopen( __FILE__, "r" ); // open __this__ file for reading
    while( !feof(source) )
    {
        // print every character in the file
        // to the console.
        printf( "%c", fgetc( source ) );
    }
}


//////////////////
// END NOTES:
//
// Note that there IS a C++ "way" to do file output
// that is "object oriented" provided through
// the 'ofstream' object.
//
// I do NOT recommend you use the ofstream
// class however.  WHY?  Because its REALLY slow.
// In simple tests I've conducted using a high performance
// counter, ofstream takes TWICE AS LONG to print
// the same stream of characters to disk
// as fprintf() does.

// See
// https://bobobobo.wordpress.com/2008/02/07/speed-tests-fprintf-vs-ofstream-and-fprintf-vs-fwrite/
// for a speed test.)

// OOP is good, but it sometimes has
// a pretty bad performance cost.
Download the Visual Studio 2005 project files hosted by esnips (thanks esnips!)
Refs
fprintf entry @ cplusplus.com
fprintf entry @ cppreference.com
I’m testing a few C/C++ funcs through having them write out 100,000 lines of data (total amounting to about 3MB) to a file.
The results: Building these with Visual Studio 2005 VC++ on Win 32:
(fprintf nearly 2x as fast as ofstream on my machine)
(fwrite about 1.1x as fast as fprintf on my machine)
// OFSTREAM IS SLOW!!

#include <fstream>
using namespace std;

#include <stdio.h>
#include <windows.h>

LARGE_INTEGER   ticksPerSecond;
LARGE_INTEGER   time1;
LARGE_INTEGER   time2;

float floatDiffTime;
const int runs = 100000;

int main()
{
    ////////////////
    // Get the speed of the CPU
    QueryPerformanceFrequency( &ticksPerSecond );
    printf( "Your computer does %lld ticks per second\n", ticksPerSecond.QuadPart );
    // %lld means type "long long" int, which is the
    // 64 bit int which is what we want here.

    // define some random valued variables to use
    // in the print statements
    int a    = 5;
    double b = 9.2919e92;
    char c   = 'x';
    char * d = "blah blah blah";


    // test start:  open a file to write to
    FILE * outfile = fopen( "testfile.txt", "w" );

    /////////////////////
    // START timing
    QueryPerformanceCounter( &time1 );

    // test fprintf(), run 100000 times!
    for(int i = 0; i < runs; i++)
    {
        fprintf(outfile, "blah %i %f %c %s\n", a, b, c, d );
        fflush( outfile );  // flush to be fair
    }

    ////////////////////
    // STOP timing
    QueryPerformanceCounter( &time2 );

    // get the difference between time1 and time2,
    // and that is how long the for loop took to run.
    floatDiffTime = ((float)time2.QuadPart - time1.QuadPart)/ticksPerSecond.QuadPart;
    printf( "fprintf took %f seconds\n", floatDiffTime );

    fclose( outfile );  // close up, so we
    // can proceed to start over with
    // ofstream test.


    ////////////////
    // testing ofstream()
    ofstream out( "oftestout.txt" );

    ////////////////////
    // START timing
    QueryPerformanceCounter( &time1 );
    //
    ////////////////////

    // test ofstream, run 100000 times!
    for(int i = 0; i < runs; i++)
    {
        out << "blah " << a << " " << b << " " << c << " " << d << endl;
        out.flush();  // flush to be fair
    }

    ////////////////////
    // STOP timing
    QueryPerformanceCounter( &time2 );
    //
    ////////////////////

    // get the difference between time1 and time2,
    // and that is how long the for loop took to run.
    floatDiffTime = ((float)time2.QuadPart - time1.QuadPart)/ticksPerSecond.QuadPart;
    printf( "ofstream took %f seconds\n", floatDiffTime );

    out.close();

    return 0;
}
Place your bets!
// what's faster, fwrite or fprintf?

#include <stdio.h>
#include <stdlib.h>

#include <windows.h>

LARGE_INTEGER   ticksPerSecond;
LARGE_INTEGER   time1;
LARGE_INTEGER   time2;

float floatDiffTime;
const int runs = 100000;
char buf[255];      // create a buffer for fwrite to use

int main()
{
    ////////////////
    // Get the speed of the CPU
    QueryPerformanceFrequency( &ticksPerSecond );
    printf( "Your computer does %lld ticks per second\n", ticksPerSecond.QuadPart );
    // %lld means type "long long" int, which is the
    // 64 bit int which is what we want here.

    // define some random valued variables to use
    // in the print statements
    int a    = 5;
    double b = 9.2919e92;
    char c   = 'x';
    char * d = "blah blah blah";


    // test start:  open a file to write to
    FILE * outfile = fopen( "testfile.txt", "w" );

    /////////////////////
    // START timing
    QueryPerformanceCounter( &time1 );

    // test fprintf(), run 100000 times!
    for(int i = 0; i < runs; i++)
    {
        //fprintf(outfile, "blah %i %f %c %s\n", a, b, c, d );

        // making fprintf() print a single string generated
        // by sprintf() to equalize the test
        sprintf( buf, "blah %i %f %c %s\n", a, b, c, d );   // its only fair!
        fprintf( outfile, "%s", buf );

        fflush(outfile);    // flush after going to the toilet
    }

    ////////////////////
    // STOP timing
    QueryPerformanceCounter( &time2 );

    // get the difference between time1 and time2,
    // and that is how long the for loop took to run.
	floatDiffTime = ((float)time2.QuadPart - time1.QuadPart)/ticksPerSecond.QuadPart;
    printf( "fprintf took %f seconds\n", floatDiffTime );

    fclose( outfile );  // close up, so we
    // can proceed to start over with
    // fwrite test.


    ////////////////
    // testing fwrite()
    outfile = fopen( "testfile.txt", "w" );

    ////////////////////
    // START timing
    QueryPerformanceCounter( &time1 );
    //
    ////////////////////

    // test fwrite(), run 100000 times!
    for(int i = 0; i < runs; i++)
    {
        // fwrite needs a single string to write from,
        // so use sprintf to copy to a buffer
        sprintf( buf, "blah %i %f %c %s\n", a, b, c, d );
        fwrite( buf, 1, strlen( buf ), outfile );
        fflush(outfile);    // flush
    }

    ////////////////////
    // STOP timing
    QueryPerformanceCounter( &time2 );
    //
    ////////////////////

    // get the difference between time1 and time2,
    // and that is how long the for loop took to run.
	floatDiffTime = ((float)time2.QuadPart - time1.QuadPart)/ticksPerSecond.QuadPart;
    printf( "fwrite() took %f seconds\n", floatDiffTime );


    fclose( outfile );
    return 0;
}
In my tests here, fwrite() was faster, even though using fwrite requires an extra call to strlen().
Anyway, this was just for fun. For all intents and purposes, fprintf() is pretty much the same speed as fwrite(). BUT fprintf is DEFINITELY much faster than ofstream!
Visual Studio 2005 project files for fprintf vs ofstream test hosted by esnips (thanks esnips!)
However, there’s quite a few more resources that regularly offer better prices than Amazon:

This one is pretty good. They’ll send you a dog-eared copy of that out-of-print-book for a rock bottom price.
This is another one of those next gen web 2.0 projects that seems to be working out ok. I haven’t tried bookmooch, but it looks good and I may try it in the near or distant future.

![]()
Excuse me, but I’m about to have a reading rainbow moment.
If you’ve ever wanted to program microcontrollers, or understand how embedded computers work, but didn’t know where to start, Tom Igoe’s book is the place for you.
dah dah daaaah!
Here’s Tom Igoe’s website, a helpful article on choosing microcontrollers, and his course’s page (i’m not enrolled though, unfortuantely!
Its a fantastic book and I would recommend it for anyone with even a passing interest in the subject.
Extremely well written, fun to read, and full of pointers.
I would also recommend it for any undergraduate electrical/computer engineers taking any sort of assembly language or hardware programming course. Definitely beneficial.
In the book he’s covering the PIC 18F452 (an 8-bit chip), and BASIC Stamp-like chips. He uses BASIC (Beginner’s All Purpose Instruction Code) to program the chips. Tom outlines the benefits of using a Stamp-like chip vs the PIC chips in the book quite clearly.
Anyhow, I was personally very interested in learning about using C to program a microcontroller.
So here are some notes on PIC (from randomly bouncing around the internet, mostly)
check: product listing page.
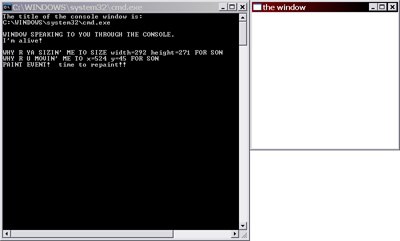
NOTE: A few comments at the bottom of this post have pointed out the existence of several functions that actually make this easier than I have shown here: particularly HWND hwnd = GetConsoleWindow();. There’s also GetModuleHandle(), used as Hardijzer mentions in the comments below, thought I might not have used this had I been aware of it. The complete listing of console functions is here on msdn.
Its actually easy! The short of it is:
// console app
#include <iostream>
using namespace std;

#include <windows.h>

int main()
{
  char title[500];  // to hold title

  // get title of console window
  GetConsoleTitleA( title, 500 );

  // get HWND of console, based on its title
  HWND hwndConsole = FindWindowA( NULL, title );

  // get HINSTANCE of console, based on HWND
  HINSTANCE hInstance = (HINSTANCE)GetWindowLong(hwndConsole, GWL_HINSTANCE);

  //alternate way
  HWND hwndC = GetConsoleWindow() ; /* Great!!  This function
  cleverly "retrieves the window handle
  used by the console associated with the calling process",
  as msdn says */

  // Then we could just get the HINSTANCE:
  HINSTANCE hInstC = GetModuleHandle( 0 ) ; // HMODULE=HINSTANCE
  //HINSTANCE hInstCons = (HINSTANCE)GetWindowLong( hwndC, GWL_HINSTANCE );
}
See msdn article on FindWindow function.
The GetWindowLong() function, in the msdn spotlight.
We now have the HWND of the console in variable hwndConsole, and the HINSTANCE of the console window in hInstance.
Now, you COULD create a window up, because you have the HINSTANCE now. The example below illustrates the “long” of it:
//////////////////////////////////////////
//                                      //
// Getting the HWND of the Console      //
//                                      //
// You found this at bobobobo's weblog, //
// https://bobobobo.wordpress.com        //
//                                      //
// Creation date:  Feb 3/08             //
// Last modified:  Feb 3/08             //
//                                      //
//////////////////////////////////////////
#include <iostream>
using namespace std;

#include <windows.h>

// So you need the handle (HWND) for the
// console window for your app.

// Who knows why.  Maybe ya just
// want it.

///////////////////////////////
// In this example, I'm:
//  1) using the HWND of the console window
//     to get the HINSTANCE of the console window
//     (GetWindowLong() function)
//
//  2) using the HINSTANCE and HWND of the
//     console window to create a regular
//     window with a WndProc and a message
//     loop and all (WNDCLASS structure,
//     RegisterClass(), then CreateWindow())

// based off of MSDN KB article
// http://support.microsoft.com/kb/124103

// prototype for the WndProc of the window that
// we're gonna create.
LRESULT CALLBACK WndProc( HWND hwnd, UINT message, WPARAM wparam, LPARAM lparam );

/////////////////
// Normally, windowed apps would start
// at WinMain().
// However, remember that this is REALLY
// a console application, and we're just
// spawning a window out of it.
// This application starts at first line of main().
int main()
{
    // console window exists as soon as app start

    // get its hwnd using combo of "GetConsoleWindowTitle()"
    // and "FindWindow()"

    // Why did i call this _REGION_A_? see end notes!
    #pragma region _REGION_A_ - get HWND of console

    char t[500];

    GetConsoleTitleA( t, 500 );     // retrieve the text
    // of the title bar of the console window

    cout << "The title of the console window is:" << endl;
    cout << t << endl << endl;

    HWND hwndConsole = FindWindowA( NULL, t );  // FindWindowA actually
    // can get you the HWND of a window, based
    // on the text in its title bar!

    // Let's check to see it worked.  If the console window
    // moves after the function call below, then we know
    // that hwndConsole is really a valid handle to the console
    // window!
    MoveWindow( hwndConsole, 20, 20, 500, 500, true );  // test hwnd

    #pragma endregion

    #pragma region _REGION_B - get HINSTANCE and create a window!
    ////////////////////////
    // Getting the HINSTANCE given the HWND
    //
    // Want the HINSTANCE of a window, but
    // you only have its HWND?
    //
    // Here's how you generally get the HINSTANCE
    // of the console, based off of the HWND of
    // the console.
    HINSTANCE hInstance = (HINSTANCE)GetWindowLong(hwndConsole, GWL_HINSTANCE);

    ////////////////////
    // Now I'm going to create an ACTUAL WINDOW.
    //
    // Note that you always need a HINSTANCE
    // to create a window, which is why I just
    // got it in the line just above here.
    WNDCLASS wc = {0};
    wc.hbrBackground =(HBRUSH)GetStockObject(WHITE_BRUSH);
    wc.hCursor = LoadCursor( hInstance, IDC_ARROW );
    wc.hIcon = LoadIcon( hInstance, IDI_APPLICATION );
    wc.hInstance = hInstance;
    wc.lpfnWndProc = WndProc;
    wc.lpszClassName = TEXT("peter");   // name of window class .. I choose peter
    wc.style = CS_HREDRAW | CS_VREDRAW;

    if (! RegisterClass( &wc ) )
    {
        cout << "Problem with your WNDCLASS, foo." << endl;
        return 1;   // ERR, SO QUIT
    }

    // Create a real live window!
    // (see https://bobobobo.wordpress.com/2008/01/31/how-to-create-a-basic-window-in-c/
    // for more details on basic windows)
    HWND hwndWindow = CreateWindow(  TEXT("peter"),
                    TEXT("the window"),
                    WS_OVERLAPPEDWINDOW,
                    520, 20, 300, 300,
                    NULL,   // if you make this hwndConsole, then
                            // the console becomes this window's parent
                            // Then, this window wouldn't get an
                            // entry in the taskbar
                    NULL,

                    hInstance, NULL );

    ShowWindow( hwndWindow, SW_SHOWNORMAL );    // ShowWindow() on msdn
    UpdateWindow( hwndWindow );
    #pragma endregion

    // Enter regular message loop, to process messages for
    // our window.
    #pragma region _REGION_C - message loop
    MSG msg;
    while( GetMessage( &msg, hwndWindow, 0, 0 ) )
    {
        TranslateMessage(&msg);
        DispatchMessage(&msg);
    }
    #pragma endregion

    return msg.wParam;
}


////////////
// The WndProc for the Window that
// we eventually open up
// (This WndProc is _NOT_ FOR THE CONSOLE WINDOW!)
LRESULT CALLBACK WndProc( HWND hwnd, UINT message, WPARAM wparam, LPARAM lparam )
{
    switch( message )
    {
        case WM_CREATE:
            cout << "WINDOW SPEAKING TO YOU THROUGH THE CONSOLE." << endl;
            cout << "I'm alive!" << endl << endl;
            Beep( 40, 40 );
            return 0;
            break;

        case WM_PAINT:  // paint event
            {
                cout << "PAINT EVENT!  time to repaint!!" << endl;
                PAINTSTRUCT ps;
                HDC hdc;
                BeginPaint( hwnd, &ps );
                EndPaint( hwnd, &ps );
                return 0;
            }
            break;

        case WM_LBUTTONDOWN:    // left clicking on the client area of the window (white part)
            cout << "WHY R YA MOUSE DOWN'IN ME AT x=" << LOWORD(lparam) << " y=" << HIWORD(lparam) << " SON" << endl;
            return 0;
            break;

        case WM_NCLBUTTONDOWN:  // NONCLIENT area leftbutton down (click on "title bar" part of window)
            //cout << "AAAH!! YER GONNA MOVE ME SON.  CAREFUL SON." << endl;
            //return 0;     // this is an interesting one.
            // try UNCOMMENTING the return 0; statement here.
            // Notice that you can NO LONGER move or manipulate
            // the window by clicking on its "title bar"
            // if you return 0; from here.  The reason for that
            // is the window movement is actually handled by
            // DefWindowProc().  That's why its so important
            // to remember to pass events you don't handle to
            // DefWindowProc() -- if you don't then the Window
            // won't act in the "default" way you're so used to
            // other windows acting in (in fact, it won't even
            // show up properly)
            break;

        case WM_CHAR:   // character key
            cout << "WHY R U CHARRING ME WITH " << (char)wparam << " FOR SON" << endl;
            return 0;
            break;

        case WM_MOVE:   // moving the window
            cout << "WHY R U MOVIN' ME TO x=" << LOWORD(lparam) << " y=" << HIWORD(lparam) << " FOR SON" << endl;
            return 0;
            break;

        case WM_SIZE:
            cout << "WHY R YA SIZIN' ME TO SIZE width=" << LOWORD(lparam) << " height=" << HIWORD(lparam) << " FOR SON"<< endl;
            return 0;
            break;

        case WM_DESTROY:    // killing the window
            cout << "NOOO!!  I . . . shall . . . return !!" << endl;
            PostQuitMessage( 0 );
            return 0;
            break;
    }

    return DefWindowProc( hwnd, message, wparam, lparam );
}


////////////////////////
// END NOTES:
//
// If you read the MSDN article carefully,
// it says some shit about wanting to
// SetConsoleTitle( "stupid unique title");
// The reason for that is, there is an OFF
// CHANCE that PERHAPS there's more than one
// window with the same exact TITLE
// as our console window.
//
// There's a bit of code at the bottom of the
// Visual Studio project files that shows
// how to do that.
//

/*
     ____   __   __      __   __  ___
    / _  \ /  / /  /    /  /  \ \/  /
   / _/ / /  / /  /    /  /    \   /
  / _/ \ /  / /  /__  /  /__   /  /
 /_____//__/ /______//______/ /__/

*/
Visual Studio 2005 project files, hosted by esnips (thanks esnips!)
//////////////////////////////////////////
//                                      //
// A Fast Windows Program               //
//                                      //
// You found this at bobobobo's weblog, //
// https://bobobobo.wordpress.com        //
//                                      //
// Creation date:  Feb 3/08             //
// Last modified:  Feb 9/08             //
//                                      //
//////////////////////////////////////////

#include <windows.h>
#include <math.h>   // for sin() and cos() in calculating npc pos

// Function prototypes.
LRESULT CALLBACK WndProc( HWND hwnd, UINT message, WPARAM wparam, LPARAM lparam );
int WINAPI WinMain( HINSTANCE hInstance, HINSTANCE hPrevInstance, LPSTR szCmdLine, int iCmdShow );

////////////////////////////
// Introduction:
//
// In the "MostBasicWindow" project, we talked
// about creating a basic window, and how
// MOST NORMAL Windows programs use something
// called "EVENT DRIVEN PROGRAMMING".

// If you don't remember, please review
// PREREQUISITES:  BASIC WINDOWS PROGRAMMING
// (see https://bobobobo.wordpress.com/2008/01/31/how-to-create-a-basic-window-in-c/
// to get started).

// In EVENT DRIVEN PROGRAMMING, your
// program is entirely driven by EVENTS.

// If there are no events, then your
// Windows program DOES NOTHING AT ALL,
// until the next EVENT is passed to it
// by the Windows O/S in the form of a
// MESSAGE.

// Now, this is a PROBLEM when it comes
// to programming a GAME AS A Windows application.

// If your app NORMALLY does nothing
// except when the user interacts with
// the application, then every time
// the user let go of all of the keys
// on the keyboard, the game would just
// simply PAUSE.  This is because
// the normal structure of a Windows
// application is to execute code
// IN RESPONSE TO EVENTS THAT COME
// to the window.  If there are no
// events, then the application is idle.

// That structure makes perfect sense
// for applications like MSWord or firefox, and its
// the only way things are sane inside
// that Windows Government and the
// processor doesn't blow up when you
// have 50 windows open at the same time.

// However, GAMES are different than normal
// standard windows apps like Firefox or
// MSWord.

// Games need to CONSTANTLY be running.  Games
// need to constantly update their state.
// Even if the player isn't doing anything,
// the game AI has to keep computing what
// the MONSTERS will do next.  The game
// has to have a concept of TIME that keeps
// on going on, even when the player isn't
// pressing any keys too.

///////////////////////
// RECALL:  The NORMAL WINDOWS PROGRAM MESSAGE LOOP:
/*
    while( GetMessage( &msg, NULL, 0, 0 ) )
    {
        // GetMessage is a function that will not
        // return until the Windows O/S HAS A message
        // for our program.

        // Since the GetMessage() function call is
        // INSIDE the bracket for the while Loop,
        // this means that our program is essentially
        // "put on hold" or halted until the GetMessage function
        // returns.

        // If and when the user interacts with our
        // application's window, then the GetMessage()
        // function WILL return and the variable
        // msg will be filled with interesting details
        // about exactly what the user did to the window.

        TranslateMessage( &msg );   // translates
        // the message so WndProc can process it
        // more easily.

        DispatchMessage( &msg );    // this line RESULTS IN
        // a call to WndProc(), passing the message and
        // the HWND.  This is OUR APPS CHANCE
        // to execute some code in response
        // to user events.
    }
*/

// The point is, GAMES CAN'T _WAIT_ FOR
// MESSAGES FROM THE WINDOWS O/S TO BE
// ALLOWED TO EXECUTE THEIR CODE!!

// Games need to run very quickly, and
// execute the following instructions
// __at least__ 60 times a second!

// {
//      checkWhatKeysUserIsPushingDown();
//      makeChangesToGameStateAndCalculateNextFrame();
//      draw();
// }

// Because GetMessage() blocks (doesn't return
// control to our app immediately!), it really
// creates a bottleneck for us!

// IN OTHER WORDS, WE HAVE TO STOP USING
// THE GetMessage() function!

// For our game, we DO NOT want to be WAITING
// for messages AT ALL.  Instead, we will
// use something else called PeekMessage()
// to VERY QUICKLY check to see if the
// Windows O/S has any messages for our
// Window.

// IF the Windows Government does have a message for us,
// THEN we process that message, then its
// back to our computing and drawing functions
// as usual.

// IF the Windows O/S DOES NOT
// have any messages for our Window, WE
// WANT TO CONTINUE RUNNING OUR OWN CODE
// ANYWAY -- WE DO NOT WANT TO GIVE UP
// CONTROL TO THE WINDOWS O/S.

#pragma region globals
HWND hwnd;      // store the HWND in a global now,
                // so our DRAW function can use it freely.

// player x and y positions.
float playerXPos = 50;
float playerYPos = 50;

// NPC x and y positions.
float npcXPos = 80;
float npcYPos = 80;
#pragma endregion

void check_for_user_input_through_keyboard()
{
    float diff = 0.01f;

    if( GetAsyncKeyState( VK_UP ) )
    {
        // up key being pushed, move player up
        playerYPos -= diff;
    }

    if( GetAsyncKeyState( VK_DOWN ) )
    {
        playerYPos += diff;
    }

    if( GetAsyncKeyState( VK_RIGHT ) )
    {
        playerXPos += diff;
    }

    if( GetAsyncKeyState( VK_LEFT ) )
    {
        playerXPos -= diff;
    }
}

// In this function, we're calculating
// the motion of the "npc unit" - very simple
void calculate_next_frame_of_our_program_by_shuffling_npc_around()
{
    // let's move the NPC unit around, in a circle.
    static float pos = 0.0f;
    pos += 0.1f;

    npcXPos += 0.01*sin( 0.001*pos );
    npcYPos += 0.01*cos( 0.001*pos );
}

void draw()
{
    HDC hdcTotalArtist = GetDC( hwnd ); // get the "handle to device context"
                                        // for our Window.

    // The "device context" is like a "total artist"
    // that has pens, brushes, and a canvas to draw to.

    // I explain that more below, but for now, let's
    // draw the player:
    Ellipse( hdcTotalArtist, (int)playerXPos, (int)playerYPos, (int)(playerXPos + 10), (int)(playerYPos + 10) );

    ////////////
    // Changing the pen color:
    // Now the npc unit should be a different color.
    // so this is REALLY QUICKLY how you change
    // the color of the "pen" that you're using
    // to draw.

    // The "device context" of our window is
    // like a TOTAL ARTIST.
    // The "device context" contains:
        // canvas
        // pens
        // brushes
        // and more!

    // In order to change the style in which the
    // standard GDI functions (like Ellipse) are
    // drawing, we would have to CHANGE THE
    // PROPERTIES OF THE DEVICE CONTEXT TO WHICH
    // WE ARE DRAWING.

    // So what we do is, we:
        // 1.  CREATE A NEW redpen,
        //      WITH ALL THE PROPERTIES
        //      WE WANT IT TO HAVE (solid lines, can select width as well)
        //
        // 2.  GIVE THAT redpen TO
        //     THE device context "total artist"
        //     by using the SelectObject() function.
        //     Note that the hdc total artist can
        //     only hold ONE PEN at a time.  So
        //     you'll see in the code that when we
        //     give the hdc total artist
        //     a new pen, WE MUST CATCH THE OLD ONE
        //     IN A VARIABLE!
        //
        // 3.  DRAW AGAIN using the Ellipse()
        //     gdi function.  Since the Ellipse()
        //     function WILL draw to an HDC,
        //     then we will see RED ELLIPSE, since
        //     we just gave the hdc total artist
        //     a red pen.

    // "select the pen into" the device context
    // by using the SelectObject() function.

    // This in a sense is like GIVING the device
    // context a new brush with which to draw,
    // or a new pen with which to draw.
    HPEN redpen = (HPEN)CreatePen( PS_SOLID, 2, RGB( 255, 0, 0 ) );
    HPEN oldpen = (HPEN)SelectObject( hdcTotalArtist, redpen );

    // draw with redpen
    Ellipse( hdcTotalArtist, (int)npcXPos, (int)npcYPos, (int)npcXPos + 10, (int)npcYPos + 10 );

    // select back the old pen, then delete the red pen
    redpen = (HPEN)SelectObject( hdcTotalArtist, oldpen );
    DeleteObject( redpen );

    ReleaseDC( hwnd, hdcTotalArtist );
}

////////////////////////////
// In a C++ Windows app, the starting point is WinMain().
int WINAPI WinMain( HINSTANCE hInstance,
                    HINSTANCE hPrevInstance,
                    LPSTR szCmdLine,
                    int iCmdShow )
{
    #pragma region part 1 - STARTUP STUFF
    WNDCLASS wc;
    wc.cbClsExtra = 0;
    wc.cbWndExtra = 0;
    wc.hbrBackground = (HBRUSH)GetStockObject( WHITE_BRUSH );
    wc.hCursor = LoadCursor( NULL, IDC_ARROW );
    wc.hIcon = LoadIcon( NULL, IDI_APPLICATION );
    wc.hInstance = hInstance;
    wc.lpfnWndProc = WndProc;
    wc.lpszClassName = TEXT("Philip");
    wc.lpszMenuName = 0;
    wc.style = CS_HREDRAW | CS_VREDRAW;

    // B.  Register the WNDCLASS with Windows, THEN
    //     create the window.
    RegisterClass( &wc );
    hwnd = CreateWindow(
        TEXT("Philip"),
        TEXT("Fast windows app!!"),
        WS_OVERLAPPEDWINDOW,
        10, 10,
        400, 400,
        NULL, NULL,
        hInstance, NULL );

    // Next, SHOW and PAINT the window!
    // You won't see the window if you DO NOT
    // call ShowWindow();
    ShowWindow(hwnd, iCmdShow );
	UpdateWindow(hwnd);
    #pragma endregion

    // first, we create the MSG structure.
    MSG msg;

    #pragma region OLD GETMESSAGE LOOP -- NORMALLY YOU SHOULD JUST DELETE THIS PART
    // -- commented out, but I STRONGLY ENCOURAGE
    // you to try commenting it back in to see
    // how it behaves and why we CAN'T be using
    // GetMessage() for our games.

    // IT DOES WORK, but its INCREDIBLY, INCREDIBLY
    // slow.

    // And on top of the extreme SLOW, you have to constantly
    // be inputting "messages" into the window in order
    // for anything to happen! (for the npc to move!)

    /*
    SetWindowText( hwnd, TEXT("SLOW MODE!!! - Press ESC for fast mode") );
    while( GetMessage( &msg, NULL, 0, 0 ) )
    {
        TranslateMessage( &msg );
        DispatchMessage( &msg );

        check_for_user_input_through_keyboard();
        calculate_next_frame_of_our_program_by_shuffling_npc_around();
        draw();
    }
    */
    #pragma endregion

    #pragma region part 2 - ENTER A LOOP TO CONTINUALLY KEEP CHECKING WITH WIN O/S FOR USER INTERACTION

    // Notice we changed the loop structure from the old
    // GetMessage() structure.  We're using PeekMessage() now.

    // It goes like this now:

    // while(FOREVER)
    // {
    //    if ( there's a message for our window )
    //    {
    //      translate and dispatch to WndProc for processing();
    //    }
    //
    //    check_for_user_input_through_keyboard();
    //    calculate_next_frame_of_our_program_by_shuffling_npc_around();
    //    draw();
    //
    // }
    SetWindowText( hwnd, TEXT("Fast windows app!!") );  // (in case you uncommented
                                                        // the GetMessage() above )
    while( 1 )  // LOOP FOREVER
    {
        // 1.  PROCESS MESSAGES FROM WINDOWS
        if( PeekMessage( &msg, NULL, 0, 0, PM_REMOVE ) )
        {
            // Now, this is DIFFERENT than GetMessage()!
            // PeekMessage is NOT a BLOCKING FUNCTION.
            // That is, PeekMessage() returns immediately
            // with either a TRUE (there was a message
            // for our window)
            // or a FALSE (there was no message for our window).

            // If there was a message for our window, then
            // we want to translate and dispatch that message.

            // otherwise, we want to be free to run
            // the next frame of our program.
            if( msg.message == WM_QUIT )
            {
                break;  // BREAK OUT OF INFINITE LOOP
                        // if user is trying to quit!
            }
            else
            {
              TranslateMessage( &msg );   // translates
              DispatchMessage( &msg );    // this line RESULTS IN
              // a call to WndProc(), passing the message and
              // the HWND.

              // Note that in this program, all we're really using
              // the messaging system for is for
              // processing the QUIT message that occurs
              // when the user clicks the X on the window
              // to close it.

              // ALL OTHER application processing happens
              // in the 3 lines of code below
              // (the 'check_for_user ... ' stuff)
           }
        }
        else
        {
           check_for_user_input_through_keyboard();
           calculate_next_frame_of_our_program_by_shuffling_npc_around();
           draw();
        }
    }
    #pragma endregion

    return msg.wParam;
}

LRESULT CALLBACK WndProc(   HWND hwnd,
                            UINT message,
                            WPARAM wparam,
                            LPARAM lparam )
{
    switch( message )
    {
    case WM_CREATE:
        // upon creation, let the speaker beep at 50Hz, for 10ms.
        Beep( 50, 10 );
        return 0;
        break;

    case WM_PAINT:
        {
            // we would place our Windows painting code here.
            HDC hdc;
            PAINTSTRUCT ps;
            hdc = BeginPaint( hwnd, &ps );

            // draw nothing here.
            // drawing happens in the
            // draw() function that
            // we MANUALLY call ourselves.

            // We DO NOT rely on messages to
            // tell us when to draw when creating
            // game!  Instead, we draw when
            // we want to.

            // WHY?  Because the WM_PAINT message
            // only comes to your window WHEN
            // the Windows O/S THINKS your window
            // needs to be redrawn.  That includes
            // only events like "if your window
            // was blocked by another window,
            // then it needs to be repainted"

            // Our fast game NEEDS to be redrawn
            // 60 times a second AT LEAST, so we
            // totally BYPASS the normal windows
            // system, and draw in our draw()
            // function of our own accord.

            EndPaint( hwnd, &ps );
        }
        return 0;
        break;

    case WM_KEYDOWN:
        switch( wparam )
        {
        case VK_ESCAPE:
            PostQuitMessage( 0 );
            break;
        default:
            break;
        }
        return 0;

    case WM_DESTROY:
        PostQuitMessage( 0 ) ;
        return 0;
        break;
    }

    return DefWindowProc( hwnd, message, wparam, lparam );
}

///////////////////////
// Closing notes:
//
// IF you'll notice, when you run this
// program, if you look at your task
// manager, (CTRL+ALT+DEL), NOTICE your
// windows application (should show up
// in processes list as BasicWindowsProgramming_GameStructure.exe)
// is now a CPU HOG.  Its taking somewhere
// close to 40-50% of CPU time.

// THIS IS GOOD. YOUR APP IS TAKING
// CONTROL OF THE SYSTEM RESOURCES
// (CPU TIME).
//
// If its a game, THIS IS EXACTLY WHAT YOU
// WANT.  Games need to hog the system
// resources in order to run the best
// they possibly can given the user's
// hardware.

// Using this Windows program structure -
// a "greedy" structure if you will -
// we can create games that run as
// fast as they can.

/*
     ____   __   __      __   __  ___
    / _  \ /  / /  /    /  /  \ \/  /
   / _/ / /  / /  /    /  /    \   /
  / _/ \ /  / /  /__  /  /__   /  /
 /_____//__/ /______//______/ /__/

*/
Visual Studio 2005 Project files hosted by esnips! (thanks esnips!)
Many, many people, when starting out with DirectX or other Microsoft technologies, go and look for a simple book on the topic.
Many newbies do not know about MSDN. Or, if they do know about MSDN, they don’t know just HOW GOOD and complete it is, simply because they’ve never tried to use it before.
The MSDN documentation CAN BE a bit annoying, simply because its so damn huge.
It is very well organized though, and if you browse through the tree hierarchy on the left (once you’ve got a good starting point!), then its very useful indeed.
The search tool doesn’t always find you the article you’re looking for though, so sometimes trying different search strings can help. Just because a bunch of weird irrelevant stuff turns up in an MSDN search, doesn’t mean that MSDN doesn’t have what you’re looking for!
IN FACT, MOST OF THE BOOKS out there on DirectX SIMPLY ADAPT OR EXPAND ON THE MSDN DOCUMENTATION. A LOT of the time, the book just provides you a subset of what MSDN provides, while not making the material all that much clearer. SOME of the books on DirectX out there are like drinking from a murky pond, while the clearer (not 100% clear, though) lake is right next to it.
As I mentioned, it can be a TAD annoying to have to LOOK FOR the appropriate MSDN article.
So here’s a pageful of links:
The rest of these links you can find by simply following the above DirectX links, but I’m including them here for convenience.
Follow this link for a great article on byte alignment.
The deal is the VC++ compiler will sometimes pad your data structures automatically so that different variables start on word boundaries.
#include <iostream>
using namespace std;

// In this example, the C++ compiler will actually pad
// the PaddedStruct structure definition with unnamed variables
// so that shorts start on word boundaries.
// So between c and d, an extra, unnamed 1 byte variable
// of type char will be added in automatically by the compiler.
// This is done so that application performance is better,
// but sometimes, you don't want that.

// To get your structures to be laid out in memory
// exactly as you'd like, with no padding, you have to change
// compiler behaviour with some #pragmas.  This example shows how.

// http://en.wikipedia.org/wiki/Data_structure_alignment

// Here is an example of a struct that gets AUTOMATICALLY
// padded out with an extra byte.
struct PaddedStruct
{
	char a;
	char b;
	char c;

 /* char PADDING; */ // the COMPILER will add in an extra byte here
                     // so the short gets started on a 2-byte boundary
	short d;
};


// Here is how you force the compiler to NOT add that extra PADDING char:
// Use the #pragma pack preprocessor directive to alter VC++ compiler behavior!
#pragma pack(push)  /* push current alignment to stack */
#pragma pack(1)     /* set alignment to 1 byte boundary */
struct UNPaddedStruct
{
	char a;
	char b;
	char c;
	short d;
};
#pragma pack(pop)   /* revert to default compiler behavior */


int main()
{
    cout << "sizeof(paddedStruct) " << sizeof(PaddedStruct) << endl;	    // should be 5, but its actually 6

    cout << "sizeof(UNpaddedStruct) " << sizeof(UNPaddedStruct) << endl;	// WILL be 5, b/c of #pragma

    return 0;
}

